Hey there! Ever feel like the world of tech is full of weird, complicated words? I know I do sometimes. Today, I want to break down two of those terms for you: “proxies” and that funky number “127.0.0.1.” They might sound intimidating, but I like to think of them as a dynamic duo for getting stuff done on your computer.
So, what’s the big deal? Well, I like using a good analogy. Imagine you’re at a restaurant. You don’t run into the kitchen to tell the chef your order, right? You tell a server, who takes it to the kitchen for you. In this story, the server is a proxy—a helpful middleman.
Now, what about 127.0.0.1? I like to call it the digital equivalent of talking to yourself in the mirror. It’s a special address your computer uses to send a message to… itself! It’s like a secret handshake for internal communication.
In this article, we’re going to hang out and explore how these two ideas work together. We’ll see why running a proxy on your own machine is such a powerful trick for developers, security folks, and just plain curious people like you and me. Ready to demystify the gateway within your own computer? Let’s dive in
What is a Proxy?
Okay, so imagine you want to send a letter to a friend, but you don’t want them to know it came directly from you. What do you do? You get a mutual friend to deliver it for you.
That mutual friend is the proxy.
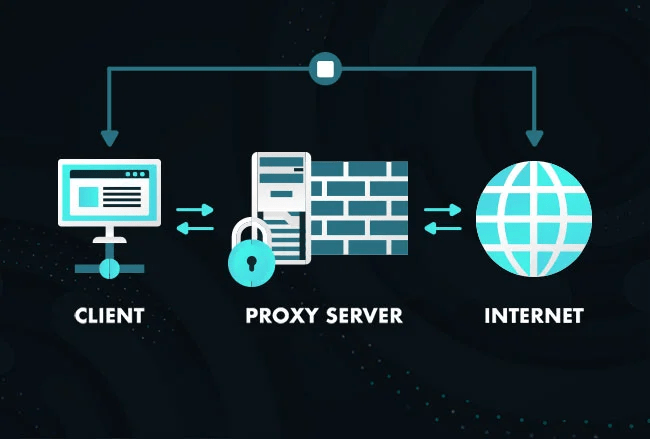
In internet terms, a proxy is just another computer that acts as a helpful middleman between you (your computer) and the rest of the internet.
Here’s how I like to think about it:
Normally (No Proxy): You → Internet
You talk directly to a website, and the website sees your exact address (your IP address).
With a Proxy: You → Proxy Server → Internet
You send your request to the proxy server first.
The proxy server then goes and gets the website for you.
The website only sees the proxy server’s address, not yours. It’s like putting on a simple disguise.
Why Would I Use One? A Couple of Simple Reasons:
I like using proxies for a few key things:
Privacy & Anonymity: It’s like wearing a digital baseball cap and sunglasses. The website you’re visiting doesn’t see you; it sees the proxy. This can help you stay a bit more private online.
Security & Filtering: Think of a bouncer at a club. A proxy can be set up to block bad websites or stop nasty viruses from getting to you. Companies and schools use these all the time.
Getting Around Blocks: Let’s say a video is blocked in your country. You can use a proxy located in a country where the video is allowed to access it for you. It’s like having a friend in another country mail you a local newspaper.
Speed (Sometimes): If many people in an office visit the same website, a proxy can save a copy of it. The next person who wants that site gets the copy, which is much faster—like getting a book from your local library instead of ordering it from a publisher across the country.
So, in a nutshell, a proxy is just a go-between. It takes your requests, handles them on your behalf, and can provide a bunch of useful benefits like privacy, security, and speed.
And remember our talk about 127.0.0.1? Well, sometimes the most useful proxy of all is one running on that very address—a “local proxy” right on your own machine for development or security testing.
How a Proxy Works: A Step-by-Step Walkthrough
I like to imagine this whole process like using a fancy food delivery app. You don’t go to the restaurant yourself; you use a middleman to handle everything for you.
The Cast of Characters:
You: The client (your web browser).
The Proxy Server: The delivery app (like Uber Eats or DoorDash).
The Website: The restaurant.
The Step-by-Step Process:
Step 1: You Place Your Order
What happens: You type a website address (e.g., www.youtube.com) into your browser.
Behind the scenes: Your browser is configured to know, “Don’t go straight to the restaurant. Send all my orders to the delivery app first.” So, it packages up your request and sends it directly to the proxy server.
Step 2: The Proxy Gets Your Order
What happens: The proxy server receives your request for www.youtube.com.
Behind the scenes: This is where the magic starts. The proxy now knows you want something. But before it does anything else, it might do a few things:
Check its rules: Is YouTube allowed? (This is filtering).
Look in its own bag: Has someone else already asked for this exact video recently? (This is caching).
Take note of the order: It might log that you, from your specific computer, asked for YouTube at 2:15 PM.
Step 3: The Proxy Places the Order For You
What happens: The proxy server now goes out onto the public internet and makes the request to www.youtube.com on your behalf.
The Key Part: When the YouTube servers see this request, they don’t see your computer’s address (your IP address). They only see the proxy server’s address. To YouTube, it looks like the proxy is the one asking for the cat videos. Your personal location is hidden!
Step 4: The Restaurant Gives the Food to the Driver
What happens: The YouTube servers send the website data (the videos, the page layout, etc.) back to the proxy server. They believe they’ve just served a customer—the proxy.
Step 5: The Proxy Hands You the Delivery
What happens: The proxy server receives the data from YouTube.
Behind the scenes (one last check): It might check the data for viruses or other malicious content. If it’s all clean, it then packages it up and sends it back to your computer.
Step 6: You Enjoy Your Meal
What happens: Your browser receives the data from the proxy and displays YouTube for you. From your perspective, everything worked perfectly, just like it always does. You might not even notice the proxy was there, but it did all the heavy lifting as your middleman.
The Whole Flow in One Glance:
You → Hey Proxy, get me YouTube! → Proxy → Hey YouTube, I want your page! → YouTube → Here’s the page, Mr. Proxy! → Proxy → Here you go, user! Here’s YouTube! → You
And that’s it! That’s the core process. I like how this shows that a proxy isn’t just a passive tunnel; it’s an active participant that can inspect, filter, cache, and anonymize your traffic every step of the way.
Next, we can look at what happens when this “delivery app” is running right on your own computer, listening to 127.0.0.1
Key Benefits and Reasons for Using a Proxy
Alright, so we know what a proxy is and how it works. But the real question is: why should you care? I like thinking about proxies as a Swiss Army knife for your internet connection—here are the coolest tools in that kit and why they’re so useful.
1. For Privacy & Anonymity: Your Digital Disguise
What it is: This is the most common reason I like using a proxy. It hides your real IP address.
Why it’s great: Think of it like this: when you visit a website directly, it sees your personal “return address” (your IP). With a proxy, the website only sees the proxy’s address, not yours. It’s a simple way to browse without every site you visit knowing exactly who and where you are.
Simple Analogy: It’s like sending a letter without your home return address on the envelope.
2. For Security: Your Personal Bouncer
What it is: A proxy can stand between you and the messy internet, filtering out the bad stuff.
Why it’s great: Companies use this all the time. A proxy can block access to malicious websites known for phishing or viruses. It can also scan downloads for malware before they ever reach your computer. It acts as a protective barrier.
Simple Analogy: It’s a club bouncer that checks your ID and doesn’t let anyone shady inside.
3. For Speed & Saving Bandwidth: The Smart Copy Machine
What it is: This is called caching. A proxy can save (or “cache”) copies of frequently visited websites.
Why it’s great: If you and your coworker both visit the same news site, the proxy can give you the copy it already saved instead of fetching the same data from the internet twice. This makes things load faster for you and saves bandwidth for the whole network.
Simple Analogy: It’s like keeping a copy of your favorite magazine in your breakroom instead of everyone going to the store to buy their own copy.
4. For Bypassing Restrictions: Your Digital Teleporter
What it is: A proxy can make it look like you’re browsing from a different location.
Why it’s great:
Access Geo-blocked Content: Is a video or service not available in your country? Connect to a proxy in a country where it is available, and you’re in!
Get Around Blocks: Schools and offices often block social media or gaming sites. By routing your traffic through a proxy, you can bypass these filters.
Simple Analogy: It’s like having a friend in another country who forwards you the local TV show you want to watch.
5. For Control & Monitoring: The Overseer
What it is: This is the reason your IT department loves proxies.
Why it’s used: In a company, proxies allow admins to see what websites employees are visiting, enforce “acceptable use” policies, and prevent data leaks. Parents can also use them to keep kids safe online.
Simple Analogy: It’s like having a logbook of all the places a company car has been driven.
So, Why Would I Use One?
I like to pick the reason that fits my goal for the day:
Feeling private? I’ll use a proxy to hide my digital tracks.
Is a website blocked on my network? I’ll use a proxy to teleport around it.
Am I developing a website? I’ll run a proxy on 127.0.0.1 to inspect and debug my own traffic.
In short, a proxy gives you more control, security, and flexibility over your experience on the web. It’s a simple concept with a ton of powerful uses.
Common Types of Proxies
Okay, so we know proxies are helpful middlemen—but did you know they come in different flavors? I like to think of them like different types of delivery services. Some are basic, some are super discreet, and others are built for heavy lifting.
Let’s break down the most common types you’ll run into.
1. Forward Proxy vs. Reverse Proxy: The Direction Matters
This is the biggest split in the proxy world. It’s all about who they’re protecting.
Forward Proxy (The Client’s Bodyguard)
What it is: This is the classic proxy we’ve been talking about. It sits in front of clients (like you and me) and acts on our behalf.
Who it protects: The users.
I like to imagine: A group of people (clients) in an office building all using one single messenger (the proxy) to go out and get things from the city (the internet). The city only sees the messenger.
Common Use: Corporate networks, bypassing filters, basic anonymity.
Reverse Proxy (The Website’s Bouncer)
What it is: This one sits in front of web servers and acts on their behalf.
Who it protects: The website or service.
I like to imagine: A famous celebrity (the web server) has a manager (the reverse proxy). All fan mail and requests go to the manager first, who handles them, so the celebrity isn’t overwhelmed.
Common Use: Load balancing (spreading traffic across multiple servers), security (hiding the server’s identity), and caching to speed up websites.
2. HTTP/HTTPS Proxies (The Web Specialists)
What they are: These are the most common proxies, designed specifically for web traffic.
HTTP Proxy: Handles basic, unencrypted web traffic.
HTTPS Proxy (SSL Proxy): Can handle encrypted HTTPS traffic. It can decrypt the traffic, inspect it, and then re-encrypt it before sending it on.
I like to think of them as: A mail sorter that only deals with packages labeled “Web.” The HTTPS version is like a sorter who can open the locked boxes to check the contents.
Best for: General web browsing, content filtering, and caching web pages.
3. SOCKS Proxies (The Universal Translators)
What it is: SOCKS (Socket Secure) is a much more flexible protocol. It doesn’t care what kind of traffic you’re sending—web, email, gaming, you name it. It just passes it along.
I like to think of it as: A general-purpose tunnel. It doesn’t look inside the boxes; it just shoves them through. The most common version is SOCKS5, which also supports better authentication and UDP traffic.
Best for: Peer-to-peer sharing, gaming, and any situation where you need to route traffic that isn’t just plain web browsing.
4. Transparent vs. Anonymous Proxies (The Stealth Meter)
This is all about how much they reveal about you.
Transparent Proxy (The Honest Snitch)
What it does: It passes your request along but does not hide your IP address. The website still sees who you are.
Why use it? You often don’t have a choice. Companies and schools use them primarily for caching and logging, not for anonymity.
I like to think of it as: A messenger who tells the restaurant exactly who placed the order, but still handles the delivery himself.
Anonymous Proxy (The Discreet Friend)
What it does: It hides your IP address from the website. The site knows it’s talking to a proxy, but it doesn’t know who is behind it.
Why use it? This is for basic privacy. It’s the most common type people think of when they want to browse anonymously.
High Anonymity (Elite) Proxy (The Ghost)
What it does: This is the top tier. It not only hides your IP address but also doesn’t reveal that it is a proxy to the website. As far as the website can tell, it’s just getting a normal visit from a regular user.
Why use it? For the highest level of anonymity, especially where detecting a proxy might itself raise flags.
Quick Guide: Which One Should I Use?
Just want to browse the web privately? An HTTP/HTTPS or Anonymous proxy is fine.
Need to route traffic for a game or torrent client? You need a SOCKS5 proxy.
Running a popular website? You’ll use a Reverse Proxy (like Nginx or Cloudflare).
Work in a corporate office? You’re probably behind a Forward and possibly Transparent proxy.
I like how each type has its own superpower. Understanding these differences helps you pick the right tool for whatever job you’re trying to do, whether it’s hiding your tracks, speeding up a website, or just playing a game without lag.
What is 127.0.0.1?
Alright, let’s demystify this! 127.0.0.1 is the most common way to write what’s known as the “loopback” address.
I like to call it your computer’s “self-address.”
It’s a special IP address that every computer uses to refer to itself. Think of it like a personal, internal hotline.
The Simple Analogy: Talking to Yourself in the Mirror
Imagine your computer is a big house with many rooms (different applications).
Your normal IP address (like 192.168.1.10) is your house’s street address. It’s how the outside world (other computers on the internet) finds you and sends you packages (data).
127.0.0.1 is the intercom system inside your house. When you use the intercom, you’re not talking to the outside world; you’re talking to yourself or someone else in another room.
So, when a program on your computer “talks to” 127.0.0.1, it’s literally just talking to another program on the same computer. The data never leaves your machine. It just loops right back to you—hence the name “loopback.”
Why is it such a big deal? What do you use it for?
I like using 127.0.0.1 for some of the most practical tech tasks:
1. Web Development & Testing (The #1 Use Case)
This is huge. When you’re building a website or web app, you don’t immediately put it on the internet. You run it locally on your own machine. So, you might start a local server that says:
“I’m listening for requests at http://127.0.0.1:3000“
Then, you open your browser and go to that address to see and test your website-in-progress, completely privately and safely.
2. Running Local Services
Maybe you’re running a local database (like MySQL) or a game server. Other programs on your computer need to connect to it. They can find it at 127.0.0.1.
3. Blocking Websites (The Hosts File Trick)
You can edit a special file on your computer (called the hosts file) and tell it: “Hey, whenever I try to go to www.distracting-website.com, send that request to 127.0.0.1 instead.” Since there’s (probably) nothing at that address on your own machine, the site just fails to load. It’s a classic way to block distractions!
A Quick Note on “localhost”
You’ll often see 127.0.0.1 written as localhost. They are exactly the same thing.
127.0.0.1 is the numerical address.
localhost is the human-friendly hostname for that address.
Typing http://localhost in your browser is identical to typing http://127.0.0.1.
So, in a nutshell, 127.0.0.1 is your computer’s way of networking with itself. It’s a fundamental tool for developers, sysadmins, and anyone who likes to tinker with software safely on their own machine.
Why is it Called “Loopback”?
Great question! The name is actually a perfect, literal description of what’s happening. I like to visualize it to make it super clear.
Imagine you have a loop of string, or you tie the two ends of a rope together. Where does it start? Where does it end? It just… loops.
That’s exactly what happens with network data sent to 127.0.0.1.
The “Loop” in Action
Here’s the step-by-step “loop”:
Start: A program on your computer (let’s call it the “Client”) decides it needs to connect to a service. It sends a data packet out onto your computer’s internal network system.
The Deception: The packet is addressed to 127.0.0.1. Your computer’s networking software sees this special address and immediately understands the secret handshake.
The “Back”: Instead of handing the packet off to your physical network card (like your Wi-Fi or Ethernet) to be sent out into the real world, the software intercepts it and loops it back to the receiving end of the network stack on the same exact machine.
The Return: The packet arrives at your computer as if it had just completed a long journey across the internet, but it never actually left. It just took a quick round trip inside the machine.
The data loops out from the software and back to the software.
A Simple Analogy: The Internal Memo
I like to think of it like sending an internal office memo.
Normal Internet Traffic: Sending an email to a colleague in another building. It goes out through the mailroom, onto the street, and to another location.
Loopback Traffic (127.0.0.1): Writing a note to yourself and putting it in your own “In” tray. You’re using the company’s internal mail system, but the note never leaves your own desk. It just loops from your “Out” box directly back to your “In” box.
Why is this “Looping Back” So Useful?
This mechanism creates a perfect, self-contained sandbox. Because the data never hits an external network, it’s:
Incredibly Fast: The data travels at the speed of electricity within your computer’s hardware, with no real-world delays.
Super Secure: Nothing from the outside can interfere with this internal conversation.
100% Reliable: It works even if you’ve unplugged your network cable, turned off Wi-Fi, or the entire internet is down. Your computer’s ability to talk to itself is fundamental and always on.
So, the name “loopback” isn’t just a fancy tech term—it’s the literal, technical description of a data packet taking a U-turn inside your machine before it even has a chance to leave. It’s the foundation for all the self-testing and local development we talked about earlier.
Practical Uses of Localhost
Okay, so we know localhost (aka 127.0.0.1) is your computer talking to itself. You might be thinking: “That sounds technical, but what can I actually do with it?”
I like to call localhost the ultimate digital sandbox—a safe, private playground on your own machine. Here are the most common and practical ways you can use it.
1. Web Development & Testing (The #1 Use Case)
This is where localhost truly shines. If you’re building a website or web app, you don’t upload it to the internet every time you change a comma. You run it locally.
How it works: You start a local development server on your machine (using tools like Live Server, a Node.js server, or a framework like React or Django’s built-in server). It says, “I’m serving the website at http://localhost:3000” (or a similar port).
What you do: You open your browser, type in http://localhost:3000, and voilà! You see your website as if it were live on the internet, but it’s running entirely on your machine. You can click around, test features, and debug issues instantly.
I like this because: It’s incredibly fast, completely private, and doesn’t require an internet connection.
2. Running Backend Services
Modern apps often need a “backend”—things like databases, APIs, or content management systems. You can run all of these on localhost.
Examples:
Database: Running a MySQL or PostgreSQL database at localhost:3306 for your app to connect to.
API: Developing a REST API that your front-end application calls at http://localhost:8000/api.
CMS: Running a local WordPress or Strapi instance at http://localhost:1337 to build and test your site’s content structure.
I like this because: It lets you build and test the entire application ecosystem in a controlled environment before you ever deploy it to a real server.
3. Learning and Experimenting with New Tools
Want to learn how to use a new software without the risk of messing up a real server? Install it on localhost!
Examples: Trying out a new database, setting up a wiki, or testing a different web server like Nginx. You can break it, reconfigure it, and start over without any consequences.
I like this because: It’s a risk-free learning environment. It’s your own personal tech playground.
4. Security and Penetration Testing
This is a super cool use case. Security professionals and ethical hackers use localhost to test their tools safely.
How it works: They run security tools like Burp Suite or OWASP ZAP and configure them to listen on localhost:8080. They then set their browser to use this local proxy. This allows them to intercept, inspect, and modify all the web traffic between their browser and the internet in a controlled way.
I like this because: It turns your machine into a security lab, letting you see exactly what data is being sent and received by your browser.
5. Blocking Websites and Ads
This is a classic power-user trick.
How it works: You can edit a special file on your computer called the hosts file. By adding a line like 127.0.0.1 www.distracting-website.com, you tell your computer, “Whenever I try to visit that website, send the request back to myself instead.”
The Result: Since your own computer isn’t hosting that distracting website, the request fails and the site doesn’t load. People often use this to block ads or social media sites for increased focus.
I like this because: It’s a simple, system-level way to control your browsing experience without any extra software.
In a Nutshell
I like to think of localhost as the most important “server” you’ll ever use. It’s where you build, break, learn, and test things in total safety before they ever see the light of the public internet. It’s the unsung hero behind almost everything a developer, IT pro, or tech tinkerer creates.
The “Local Proxy” Concept
Alright, now let’s bring these two ideas together! The “Local Proxy” is one of my favorite concepts because it makes something powerful feel so simple.
What is a Local Proxy?
A Local Proxy is just a proxy server that you run on your own computer, listening on 127.0.0.1 (localhost).
Think of it this way:
A normal proxy is like a shared post office box in another city that you use to receive all your mail.
A local proxy is like setting up your own personal mail sorting station right in your home office.
It’s the same helpful middleman functionality, but it’s running entirely on your machine, for your eyes only.
Why This Combo is So Powerful
I like this setup because it gives me the benefits of a proxy with the privacy and control of a local tool.
The Architecture in a Nutshell:
Your Browser → 127.0.0.1:8080 (Local Proxy) → Internet
The client (your browser) and the proxy server are both on the same computer, communicating through that internal loopback address.
Why Would I Run a Proxy on My Own Machine?
This is where it gets really practical. I like using local proxies for several hands-on tasks:
1. Web Development & Debugging
When I’m building a website, I can run a local proxy to:
Inspect HTTP traffic between my browser and my local development server
Debug API calls to see exactly what data is being sent and received
Modify requests and responses on the fly to test different scenarios
2. Security Testing & Ethical Hacking
This is a big one! Security tools like Burp Suite or OWASP ZAP are essentially sophisticated local proxies. I configure them to listen on 127.0.0.1:8080, then point my browser to use this proxy. Now I can:
Intercept and analyze every request my browser makes
Test for vulnerabilities by modifying parameters
Scan websites for security issues
3. Privacy & Ad Blocking
I can run lightweight filtering proxies locally:
Privoxy can remove ads and tracking cookies before they even reach my browser
A local DNS resolver like Pi-hole in a Docker container can block ads at the network level
4. API Development & Mocking
When I’m building an app that depends on an external API:
I can run a mock server on localhost that simulates the real API
My app talks to the local proxy, which returns realistic fake data
This lets me keep developing even when the real API is down or I don’t have internet
The Security Superpower: Isolation
Remember why we bind to 127.0.0.1 instead of 0.0.0.0? This is crucial for local proxies:
127.0.0.1:8080 = Only programs on this computer can use the proxy
0.0.0.0:8080 = Anyone on your network could potentially use your proxy
I always make sure my local proxies listen on 127.0.0.1 unless I have a very good reason not to. It’s like locking your front door even when you’re home.
Real-World Example You’ve Probably Used
If you’ve ever run a local development server with a command like:
npm start
And then saw something like:
Server running at http://localhost:3000
Congratulations! You’ve used a local proxy! That development server is acting as a proxy between your browser and your application code.
Why I Love This Concept
The local proxy turns your computer into a self-contained networking lab. You get all the analytical power of a proxy without any of the privacy concerns of sending your data to a third party. It’s like having an X-ray machine for your internet traffic, right in the comfort of your own machine.
It’s the perfect marriage of the proxy’s power with localhost’s privacy and safety.
Why Configure a Proxy to Listen on 127.0.0.1?
This is one of those crucial “best practice” settings that seems small but makes a huge difference. I like to think of it as choosing between having a private conversation in your soundproof office versus shouting it across a crowded coffee shop.
Here’s why telling a proxy to listen specifically on 127.0.0.1 is so important.
1. Security: Locking the Front Door
This is the #1 reason. It restricts access to programs running on your computer, and only your computer.
When you listen on 127.0.0.1:8080: The proxy only accepts connections that originate from the same machine. It’s like a phone line that only accepts calls from inside the same building.
The Danger of the Alternative (0.0.0.0): If you configure the proxy to listen on 0.0.0.0:8080, it means “listen on every network interface this computer has.” This makes it accessible to anyone else on your Wi-Fi or local network. A poorly secured proxy could become an open relay for others to abuse.
I like this because: It’s the simplest way to prevent accidental exposure. You’re building a firewall with just one setting.
2. Isolation: Creating a Digital Sandbox
By binding to 127.0.0.1, you’re explicitly creating a self-contained environment. The data loop we talked about becomes a perfect, isolated circuit.
No Network Noise: Other computers on your network can’t see or interfere with your proxy’s traffic. This is essential for clean testing and debugging.
Predictable Environment: You know exactly where the traffic is coming from and going to—nowhere but your own machine.
I like this because: It eliminates variables. When I’m debugging a web application, I don’t want to wonder if some weird network issue is causing the problem. With a local proxy, I know the entire path the data takes.
3. Convenience and Standardization
127.0.0.1 is a universal constant. It means the same thing on every single computer that supports networking.
It Just Works: You don’t need to know your computer’s real IP address (which can change). You can always rely on localhost being there.
Scripts and Tools: You can write scripts, configuration files, and documentation that say “connect to 127.0.0.1:8080” and they will work on any developer’s machine, anywhere.
I like this because: It’s one less thing to think about. It’s a fixed, reliable anchor point in the often-chaotic world of networking.
The Crucial Comparison: 127.0.0.1 vs. 0.0.0.0
This is where the concept really clicks for people. Let’s imagine your computer is a house.
Listening on 127.0.0.1:8080 (localhost)
Analogy: It’s like a private intercom system between rooms inside your house. Only people already inside the house can use it.
Result: Safe, private, and isolated.
Listening on 0.0.0.0:8080 (all interfaces)
Analogy: It’s like setting up a lemonade stand on your front lawn with a big sign that says “EVERYONE WELCOME.” People walking by on the street (your local network) can come and use it.
Result: Potentially exposed and accessible to others.
When Would You Not Use 127.0.0.1?
You would only avoid 127.0.0.1 when you specifically want other computers to connect to your proxy. Examples include:
Setting up a shared caching proxy for your entire team in an office.
Running a reverse proxy that needs to be publicly accessible on a server.
But for 99% of personal, development, and security testing work, 127.0.0.1 is the correct and secure choice.
In short, configuring your proxy to listen on 127.0.0.1 is like closing and locking your front door. It’s a simple, fundamental step that keeps your digital home secure and your traffic private.
Common Scenarios and Tools
Alright, let’s get practical! I like seeing how these concepts come to life with real tools you can actually use. Here are the most common scenarios where you’d use a local proxy, and the specific tools that make it happen.
1. Web Development & Debugging
The Scenario: You’re building a website and need to see exactly what’s happening between the browser and your code.
Tools I Like:
Browser Developer Tools: Built right into Chrome, Firefox, etc. The Network tab is essentially a simple local proxy that shows you all requests.
Webpack Dev Server: When you run npm start with React or Vue, you’re spinning up a local development server at localhost:3000 that acts as a proxy between your browser and your source files.
Charles Proxy: A more advanced tool that lets you inspect, throttle, and map network requests. Perfect for debugging API calls.
2. Security Testing & Ethical Hacking
The Scenario: You want to analyze web traffic for vulnerabilities or understand how an application communicates.
Tools I Like:
Burp Suite: The industry standard. You configure it to listen on 127.0.0.1:8080, set your browser to use it as a proxy, and suddenly you can intercept and modify every request. I like how it turns your browser into a security laboratory.
OWASP ZAP: A fantastic free alternative to Burp. Same concept—local proxy for intercepting and testing web traffic.
mitmproxy: A command-line tool that’s incredibly powerful for security testing and automation.
3. Privacy & Ad Blocking
The Scenario: You want to block ads and trackers before they even reach your browser, without installing browser extensions.
Tools I Like:
Privoxy: A lightweight filtering proxy that you run locally. It can remove ads, cookies, and other privacy-invading elements from web traffic.
Pi-hole (in Docker): While usually run on a network, you can run Pi-hole in a Docker container on your local machine. It acts as a DNS sinkhole, blocking ads at the network level by routing them to 127.0.0.1.
4. API Development & Mocking
The Scenario: You’re building a front-end that needs to talk to an API that doesn’t exist yet, is down, or you want to test error scenarios.
Tools I Like:
JSON Server: One of my favorites for quick prototyping. You create a simple JSON file, run json-server –watch db.json, and it gives you a full fake REST API at localhost:3000.
Mockoon: A great GUI tool for creating mock APIs locally. You can define endpoints, responses, and even add delays to simulate real-world conditions.
Postman Mock Server: You can create a mock server directly from your Postman collections that runs locally.
5. Performance Testing & Throttling
The Scenario: You need to test how your website performs on slow connections.
Tools I Like:
Browser DevTools Network Throttling: Built-in and easy—you can simulate 3G, 4G, etc., right in your browser.
Charles Proxy: Beyond debugging, it has excellent throttling features to simulate slow networks.
Windows Resource Manager: Can actually throttle all network traffic for specific applications.
Real-Life Workflow Example: The Security Test
Here’s how I might use these tools together:
Start Burp Suite and configure it to listen on 127.0.0.1:8080
Configure Firefox to use my local proxy (127.0.0.1:8080)
Browse to my web application at localhost:3000
Intercept login requests in Burp Suite and test for SQL injection vulnerabilities
Modify parameters and forward the requests to see how the application responds
The beautiful part? All of this happens in a completely contained environment. The website, the proxy, and the browser are all on the same machine, talking through 127.0.0.1.
Why This Matters
I like that these tools turn abstract networking concepts into tangible superpowers. Whether you’re a developer trying to debug a tricky API issue, a security professional testing applications, or just someone who wants more control over their internet traffic, there’s a local proxy tool that can help.
The pattern is always the same: run a tool locally, point your traffic to it, and gain visibility and control you wouldn’t have otherwise. It’s one of the most practical applications of the “computer talking to itself” concept you’ll ever use.
Example: Configuring a Simple HTTP Proxy (e.g., mitmproxy)
Alright, let’s get our hands dirty! I like learning by doing, so let’s walk through setting up mitmproxy—a fantastic, free tool that’s perfect for seeing a local proxy in action. It’s like giving your internet traffic a set of X-ray glasses.
What We’re Going to Do
Install mitmproxy
Start it listening on 127.0.0.1
Configure our browser to use it
Watch our web traffic flow through it
Step 1: Installation
First, you need to get mitmproxy on your machine.
On macOS (using Homebrew):
brew install mitmproxy
On Windows/Linux (using pip):
pip install mitmproxy
Or download the standalone binary from their website.
Step 2: Start mitmproxy and Bind to 127.0.0.1
Open your terminal and run this simple command:
mitmproxy –listen-host 127.0.0.1 –listen-port 8080
Let me break down what this means:
–listen-host 127.0.0.1: This tells mitmproxy to only accept connections from your local machine. This is our security measure!
–listen-port 8080: This is the port it will listen on. You could use 8888, 9090, etc.—just pick one that’s not already in use.
What you’ll see: A cool terminal-based interface will open up, ready to capture traffic. It will look something like this (but in your terminal):
Mitmproxy listening at http://127.0.0.1:8080
[No flows captured yet]
Pro Tip: If you just run mitmproxy without any arguments, it defaults to 127.0.0.1:8080, but I like being explicit—it helps remember what’s actually happening.
Step 3: Configure Your Browser to Use the Proxy
Now we need to tell our browser to send all its traffic through our new local proxy.
The Simple Way (Recommended for Testing):
Open Firefox (it’s easier to configure proxies separately from your system)
Go to Preferences > Network Settings
Select Manual proxy configuration
Enter:
HTTP Proxy: 127.0.0.1
Port: 8080
Check “Also use this proxy for HTTPS”
Click OK
What this does: Every web request Firefox makes will now be sent to 127.0.0.1:8080 (your mitmproxy) instead of directly to the internet.
Step 4: Observe the Traffic Flow
Now for the magic!
Keep the mitmproxy terminal window visible
In your configured Firefox browser, visit any HTTP website (like http://example.com)
Watch what happens in your mitmproxy terminal! You should see lines appearing showing each request:
GET http://example.com/
GET http://example.com/css/style.css
GET http://example.com/images/logo.png
Try selecting a request with your arrow keys and pressing Enter. You can see all the details:
Request headers
Response headers
The actual content
Now try an HTTPS site (like https://httpbin.org). You’ll see a warning about the certificate not being trusted. This is normal! mitmproxy generates its own certificates to decrypt HTTPS traffic. To fix this, visit http://mitm.it in your proxied browser and install the mitmproxy Certificate Authority.
What You’re Actually Seeing
I like to think of this process like being a network traffic director:
Your Browser: “Hey, I want to visit example.com!”
mitmproxy (at 127.0.0.1:8080): “Got it, let me get that for you… goes to actual example.com … Okay, here’s the response!”
The Website: “I’m sending this data to the proxy at 127.0.0.1” (it has no idea this is actually your own computer!)
Cleaning Up
When you’re done testing, don’t forget to:
Go back to Firefox Network Settings and change it back to “Use system proxy settings”
Press q and confirm to quit mitmproxy in your terminal
Why This is So Cool
I like this example because in about 5 minutes, you’ve:
Set up a professional-grade traffic inspection tool
Created a secure, isolated testing environment
Actually seen the HTTP requests that are normally invisible
This exact same pattern works for Burp Suite, OWASP ZAP, or any other proxy tool. The principles are always the same: run tool locally → configure browser to use it → watch the magic happen.
It turns the abstract concept of a “local proxy” into something you can actually touch and use. Pretty powerful for a tool that’s just talking to itself at 127.0.0.1, right?
Understanding the Binding: 127.0.0.1:8080 vs. 0.0.0.0:8080
This is one of those concepts that seems technical but is actually super important—and I like to explain it with a simple house analogy that makes it click instantly.
The House Analogy
Imagine your computer is a house with multiple doors:
127.0.0.1:8080 = The Internal Intercom
It only works inside the house.
Only people already in the house can use it.
Secure and private.
0.0.0.0:8080 = The Front Door, Back Door, and Every Window
Anyone can knock on any entrance to your house.
People from the street (your local network) can come in.
Potentially exposed.
Breaking It Down Technically
Binding to 127.0.0.1:8080 (Localhost)
What it means: “Only accept connections that come from this exact machine.”
How it works: The proxy only listens on the loopback interface. This is a virtual network interface that only exists for internal communication.
Who can connect:
Programs running on your computer
Your web browser pointing to localhost:8080 or 127.0.0.1:8080
Nothing from outside your computer
When I use this:
Development servers
Security tools like Burp Suite
Any proxy I’m running for personal use
Basically, 99% of the time!
Binding to 0.0.0.0:8080 (All Interfaces)
What it means: “Accept connections from ANY network interface this computer has.”
How it works: The proxy listens on every network connection your computer has:
Loopback (127.0.0.1)
Wi-Fi (e.g., 192.168.1.100)
Ethernet (e.g., 10.0.0.5)
Virtual networks (Docker, VPNs, etc.)
Who can connect:
Your computer (via localhost)
Other computers on your Wi-Fi
Other computers on your Ethernet network
Basically, anyone who can reach your IP address
When I use this:
When I want to share a service with my team on the same network
When running a public web server
When using Docker containers that need to communicate
Almost never for personal proxy tools!
Real-World Example
Let’s say you’re running a proxy on port 8080:
Scenario 1: Bound to 127.0.0.1:8080
# You run:
mitmproxy –listen-host 127.0.0.1 –listen-port 8080
# What works:
curl http://localhost:8080 ✅
curl http://127.0.0.1:8080 ✅
# What doesn’t work (from your phone or another computer):
curl http://192.168.1.100:8080 ❌
# (even if 192.168.1.100 is your computer’s real IP)
Scenario 2: Bound to 0.0.0.0:8080
# You run:
mitmproxy –listen-host 0.0.0.0 –listen-port 8080
# What works:
curl http://localhost:8080 ✅
curl http://127.0.0.1:8080 ✅
curl http://192.168.1.100:8080 ✅
# And from your phone on the same Wi-Fi:
curl http://192.168.1.100:8080 ✅
The Security Implications
This is where it gets serious. I like to be very careful here:
Binding to 0.0.0.0 can accidentally expose your proxy:
# DANGER: If you do this without firewall protection:
mitmproxy –listen-host 0.0.0.0 –listen-port 8080
# Now anyone on your coffee shop Wi-Fi could potentially:
# 1. Discover your proxy
# 2. Use it to browse the web (making you responsible for their traffic)
# 3. Attempt to attack it
Binding to 127.0.0.1 keeps you safe by default:
# SAFE: This is what you should usually do:
mitmproxy –listen-host 127.0.0.1 –listen-port 8080
# Even if someone finds your computer on the network,
# they cannot connect to your proxy
How to Check What’s Bound Where
I like using these commands to see what’s listening where:
On Linux/Mac:
netstat -an | grep 8080
# or
lsof -i :8080
On Windows:
netstat -an | findstr 8080
You’ll see lines like:
TCP 127.0.0.1:8080 0.0.0.0:0 LISTENING
TCP 0.0.0.0:8080 0.0.0.0:0 LISTENING
The first address tells you what it’s bound to!
The Simple Rule of Thumb
I like to follow this easy guideline:
127.0.0.1:8080 = “For my eyes only”
0.0.0.0:8080 = “For everyone on my network”
Unless you have a specific reason to share your proxy with other computers, always default to 127.0.0.1. It’s the safer, more private choice that keeps your digital doors locked while still letting you do all the cool local proxy stuff we talked about.
It’s one of those simple settings that shows the difference between being a casual user and someone who really understands how network security works!
Security Implications of Binding
This is where we get into the “why” behind all those careful choices about 127.0.0.1 vs 0.0.0.0. I like to think of binding as deciding who gets a key to your house—and the security implications are huge.
The Dangers of Accidentally Listening on 0.0.0.0
1. Unintended Network Exposure
This is the most common and dangerous mistake. When you bind to 0.0.0.0, you’re essentially announcing your service to everyone on your network.
Real-world scenario:
# You think you’re running a private development server
python -m http.server 8000 # DANGER: Defaults to 0.0.0.0 on some systems!
# Meanwhile, across the coffee shop Wi-Fi…
# An attacker scans the network and finds your open port 8000
nmap -p 8000 192.168.1.0/24
What could happen:
Someone accesses your development work
They exploit vulnerabilities in your unfinished code
They use your server as a proxy for their own activities
2. Becoming an Open Proxy
This is particularly dangerous with actual proxy tools like mitmproxy or Burp Suite.
The risk:
# Accidentally running:
mitmproxy –listen-host 0.0.0.0 –listen-port 8080
# Now anyone on your network can:
curl –proxy http://YOUR_IP:8080 http://example.com
Consequences:
Your IP gets banned from websites due to others’ abuse
You become responsible for malicious traffic originating from your IP
Attackers can intercept their own traffic through your machine
3. Information Leakage
Services bound to 0.0.0.0 might expose:
Debug information with stack traces
Configuration details
API keys and credentials in development environments
Internal application structure
When Binding to 0.0.0.0 is Actually Necessary
I don’t want to make it sound like 0.0.0.0 is always evil—there are legitimate uses, but they require careful planning.
Legitimate scenarios:
Web servers meant to be publicly accessible
API servers serving multiple clients
Database servers in a trusted network
Team development where you need to share a local server
But even then, you need protection:
# If you MUST bind to 0.0.0.0, at least use a firewall
# Example: Only allow specific IPs to access port 8000
sudo ufw allow from 192.168.1.100 to any port 8000
Defense in Depth: Security Measures
I like to use multiple layers of protection:
1. Always Default to 127.0.0.1
# Good habits for common tools:
mitmproxy –listen-host 127.0.0.1 # Explicit safety
python -m http.server –bind 127.0.0.1 8000 # Python 3
node server.js # Most Node dev servers default to localhost
2. Use Firewalls as a Safety Net
Even if you mess up, a firewall can save you.
On Linux:
# Block all incoming connections by default
sudo ufw enable
sudo ufw default deny incoming
# Or be more specific – block a port you might accidentally open
sudo ufw deny 8080
On Windows/Mac:
Enable the built-in firewall
Be cautious when applications ask for firewall exceptions
3. Network Segmentation
If you’re on a potentially untrusted network (coffee shop, conference Wi-Fi):
Use a VPN to create a secure tunnel
Avoid running any services bound to 0.0.0.0
Consider using a hotspot instead of public Wi-Fi
4. Regular Security Scans
Check your own system periodically:
# See what’s actually listening
netstat -tulpn | grep LISTEN
# Or use a port scanner on yourself
nmap -sT 127.0.0.1
nmap -sT YOUR_LOCAL_IP
The Developer’s Mindset
I like to cultivate these security habits:
Before running any service, ask:
“Who really needs to access this?”
“What’s the worst that could happen if someone else accessed it?”
“Is there sensitive data in development logs or environment variables?”
When in doubt, use this rule:
# When unsure, start with the most restrictive binding
your-tool –host 127.0.0.1 –port 8080
# Only change to 0.0.0.0 if you have a specific, justified need
# AND you’ve implemented additional security controls
Real-World Cautionary Tale
I once saw a developer accidentally commit their .env file with database credentials to a public repository. Their local database was bound to 0.0.0.0 for “convenience.” Within hours, attackers found the exposed database and wiped it clean.
The fix was simple:
# Instead of:
mongod –bind_ip 0.0.0.0
# They should have used:
mongod –bind_ip 127.0.0.1
The Bottom Line
Binding security isn’t about being paranoid—it’s about being smart. I like to think of it as digital hygiene, like locking your front door. You might live in a safe neighborhood, but why take the risk?
Remember:
127.0.0.1 = Your private office
0.0.0.0 = A public billboard with your phone number
Choose wisely, because in networking, the default settings often favor convenience over security. The few seconds it takes to specify 127.0.0.1 could save you from hours of security headaches later.
IPv6 and the Loopback Address (::1)
Okay, let’s talk about the future! I like to think of IPv6 as the updated, more spacious version of the internet’s addressing system—and it has its own version of 127.0.0.1 that’s worth understanding.
What is ::1?
In IPv6, ::1 is the loopback address. It’s the exact equivalent of 127.0.0.1 in IPv4.
IPv4: 127.0.0.1 (localhost)
IPv6: ::1 (localhost)
The double colon is IPv6 shorthand for “fill in all the missing segments with zeros.” The full, unabbreviated version is:
0000:0000:0000:0000:0000:0000:0000:0001
But who wants to type all that? ::1 is so much cleaner!
Why Do We Need an IPv6 Loopback?
You might wonder why we can’t just stick with good old 127.0.0.1. There are a few reasons I like having ::1:
1. IPv6 is the Future
The world is running out of IPv4 addresses. IPv6 provides an astronomically larger address space, and as we transition, everything needs an IPv6 equivalent—including loopback.
2. Some Systems Prefer IPv6
Modern operating systems often have IPv6 enabled by default and may try to use it first. If you’re running a service that only listens on 127.0.0.1, but a client tries to connect via ::1, the connection will fail.
3. Consistency in Modern Applications
Newer tools and applications are being built with IPv6 in mind from the start. I like that ::1 gives us the same “localhost” functionality in both protocols.
Practical Differences You Might Encounter
Binding Your Services
When you start a service, you might need to specify which addresses to bind to:
# IPv4 only (traditional)
python -m http.server –bind 127.0.0.1 8000
# IPv6 only
python -m http.server –bind ::1 8000
# Both IPv4 and IPv6 (common default)
python -m http.server –bind :: 8000
Notice that :: in IPv6 is similar to 0.0.0.0 in IPv4—it means “listen on all IPv6 interfaces.”
Testing Connectivity
Just like you can test 127.0.0.1, you can test ::1:
# Test IPv4 localhost
ping 127.0.0.1
# Test IPv6 localhost
ping ::1
# or
ping6 ::1
In Browser URLs
You can use IPv6 localhost in URLs, but you need brackets because of the colon syntax:
http://[::1]:8080
http://[::1]:3000
Common Issues and Solutions
I like being prepared for these common hiccups:
Problem: “Connection Refused” with ::1
Scenario: Your service works with 127.0.0.1:8080 but not with [::1]:8080.
Cause: The service is only bound to IPv4.
Solution: Start your service to listen on both protocols:
# For many applications, use “::” to listen on all interfaces
your-server –host :: –port 8080
# Or specify both explicitly
your-server –host 0.0.0.0 –port 8080 –host :: –port 8080
Problem: Tools Defaulting to IPv6 When You Want IPv4
Scenario: A tool tries to connect to ::1 but you need it to use 127.0.0.1.
Solution: Force IPv4:
curl -4 http://localhost:8080
# or explicitly use the IPv4 address
curl http://127.0.0.1:8080
Security Implications
Good news! The security principles we learned for 127.0.0.1 apply exactly the same way to ::1.
Safe (isolated to your machine):
# IPv4
mitmproxy –listen-host 127.0.0.1 –listen-port 8080
# IPv6
mitmproxy –listen-host ::1 –listen-port 8080
Potentially exposed:
# IPv4 (dangerous)
mitmproxy –listen-host 0.0.0.0 –listen-port 8080
# IPv6 (also dangerous)
mitmproxy –listen-host :: –listen-port 8080
The “localhost” Hostname
Here’s some good news: In most modern systems, the hostname localhost resolves to both addresses:
127.0.0.1 (IPv4)
::1 (IPv6)
This means when you visit http://localhost:3000, your system will try both and use whichever works. I like this because it usually “just works” without you needing to think about the protocol version.
Why This Matters for Your Proxy Work
When you’re setting up local proxies and development servers, being aware of ::1 helps you:
Avoid confusing “connection refused” errors
Future-proof your applications
Understand what’s happening when tools automatically choose IPv6
Configure services correctly in dual-stack environments
The bottom line? ::1 is just 127.0.0.1 wearing a modern outfit. Same great loopback functionality, just updated for the next generation of internet networking. I like that it keeps the concept simple while moving technology forward!
Common Issues and How to Solve Them
Alright, let’s get real—working with proxies and localhost doesn’t always go smoothly. I like to think of these issues as little puzzles to solve. Here are the most common problems you’ll encounter and how to fix them.
1. “Connection Refused” Errors
The Problem: You try to connect to 127.0.0.1:8080 but get a “connection refused” error.
What it usually means: Nothing is listening on that port, or it’s listening on a different address.
How to solve it:
Step 1: Check if your service is actually running
# On Linux/Mac:
ps aux | grep your-service-name
# On Windows:
tasklist | findstr your-service-name
Step 2: Check what’s listening on the port
# Linux/Mac:
lsof -i :8080
# or
netstat -tulpn | grep 8080
# Windows:
netstat -ano | findstr 8080
Step 3: Verify the binding address
Look at the output. Does it show:
127.0.0.1:8080 # Good – bound to localhost
0.0.0.0:8080 # Okay – bound to all interfaces
::1:8080 # Good – IPv6 localhost
YOUR_IP:8080 # Might be issue if you’re using localhost
Common fixes:
Restart your service with explicit binding: your-tool –host 127.0.0.1 –port 8080
Make sure you’re using the right port number
Check if the service crashed on startup
2. “Address Already in Use”
The Problem: You try to start a service but get “address already in use” or “port already in use.”
What it means: Another process is already using that port.
How to solve it:
Find and kill the process using the port:
# Linux/Mac – find the PID
lsof -ti:8080
# Then kill it:
kill -9 $(lsof -ti:8080)
# Windows – find the PID
netstat -ano | findstr 8080
# Then kill it (replace 1234 with the actual PID):
taskkill /PID 1234 /F
Or just use a different port:
# Sometimes easier than fighting with the existing process
your-service –port 8081
Pro tip: I like using ports in the 8000-9000 range for development—they’re less likely to conflict with system services.
3. Proxy Configuration Mistakes
The Problem: Your browser says it can’t connect to the internet when the proxy is enabled.
What it means: Either the proxy isn’t running, or your configuration is wrong.
Troubleshooting steps:
Check the proxy is running (see Issue #1 above)
Verify browser settings:
In Firefox: Settings > Network Settings > Manual proxy configuration
Make sure you entered 127.0.0.1 and the correct port (like 8080)
Check “Use this proxy for all protocols”
Test the proxy directly:
# Can you reach the proxy?
curl -v http://127.0.0.1:8080
# Test through the proxy:
curl –proxy http://127.0.0.1:8080 http://example.com
Check for HTTPS issues:
If visiting HTTPS sites fails, you might need to install the proxy’s CA certificate
Visit http://mitm.it if using mitmproxy to install certificates
4. “Forbidden” or “Access Denied” from Proxy
The Problem: The proxy is running and accepting connections, but rejecting your requests.
Common causes:
Proxy has access controls enabled
You’re trying to connect from the wrong IP address
The proxy requires authentication
Solutions:
# If the proxy is bound to 127.0.0.1, make sure you’re connecting FROM localhost
# Not from your machine’s external IP
# Check if the proxy needs authentication:
your-proxy –auth username:password
# Or disable access controls during development:
your-proxy –allow-all
5. Firewall Blocking Connections
The Problem: Everything seems right, but connections still fail.
What to check:
Is your firewall blocking the port?
# Linux – check iptables/ufw
sudo ufw status
sudo iptables -L
# Windows – check Windows Firewall
# Search “Windows Firewall” in Start menu
# Mac – check pfctl or application firewall
sudo pfctl -s rules
Temporarily disable firewall for testing:
# Linux (ufw):
sudo ufw disable
# Remember to re-enable later: sudo ufw enable
# Windows: Not recommended, but can test
Better solution: Add a specific rule for your development port:
# Linux (ufw):
sudo ufw allow 8080
# Or only from localhost (safer):
sudo ufw allow from 127.0.0.1 to any port 8080
6. IPv4 vs IPv6 Confusion
The Problem: Service works with 127.0.0.1 but not localhost, or vice versa.
The issue: localhost might resolve to IPv6 (::1) but your service only listens on IPv4 (127.0.0.1)
Solutions:
Force IPv4:
# Use 127.0.0.1 explicitly instead of localhost
http://127.0.0.1:8080
# Or configure your service to listen on both:
your-service –host :: –port 8080 # Listens on IPv4 and IPv6
Check hosts file:
# Linux/Mac: /etc/hosts
# Windows: C:WindowsSystem32driversetchosts
# Should have line like:
127.0.0.1 localhost
::1 localhost
7. Certificate Errors with HTTPS
The Problem: You get SSL certificate warnings when using a debugging proxy.
Why this happens: The proxy generates its own certificates to decrypt HTTPS traffic.
Solutions:
Install the proxy’s CA certificate:
Visit the proxy’s certificate installation page (often http://mitm.it)
Follow instructions for your OS/browser
Restart your browser after installing
Or temporarily accept the risk:
In development, you can click “Advanced” and “Proceed anyway”
Never do this in production!
Quick Debugging Checklist
When things go wrong, I like to run through this mental checklist:
Is it running? → Check processes and ports
Is it listening where I think? → Verify binding address
Can I reach it directly? → Test with curl or telnet
Is something blocking it? → Check firewall and antivirus
Am I connecting correctly? → Verify client configuration
The Ultimate Fallback
When all else fails:
# The classic IT solution
restart-your-computer
# Or at least:
restart-your-browser
restart-your-proxy
Most of these issues come down to simple misconfigurations or misunderstandings about what’s running where. The key is to methodically check each piece of the puzzle until you find the broken one. I like that once you solve these issues a few times, they become second nature!
Conclusion
Well, we’ve covered quite a journey together! I like to look back and see how all these concepts connect into a really powerful understanding.
We started with the basics—learning that a proxy is just a helpful middleman, like a trusted friend who handles your deliveries. Then we discovered that 127.0.0.1 (localhost) is your computer’s way of having a conversation with itself, creating the perfect private playground for testing and development.
But the real magic happened when we brought these two ideas together. I love how the local proxy concept turns abstract networking theory into something incredibly practical. Whether you’re:
Debugging a web application with mitmproxy
Testing security with Burp Suite
Developing an API with a local mock server
Blocking ads with a local filtering proxy
…you’re using that same powerful pattern: running a proxy on 127.0.0.1 to gain visibility and control over your network traffic.
We also tackled the important security considerations—understanding why binding to 127.0.0.1 keeps you safe while 0.0.0.0 could leave you exposed. And we worked through those common issues that used to frustrate me, like “connection refused” errors and port conflicts.
What I really love about this knowledge is how immediately useful it is. The next time you run npm start and see “Server running at http://localhost:3000”, you’ll understand exactly what’s happening under the hood. When you configure a tool to use a proxy, you’ll know why 127.0.0.1:8080 is the go-to address.
This isn’t just academic knowledge—it’s a practical superpower for anyone who works with computers. Developers, security professionals, system administrators, and even curious tech enthusiasts all benefit from understanding these fundamentals.
So the next time you’re troubleshooting a network issue or setting up a new tool, remember: you’ve got this! You understand the gateway within your own computer, and that’s a pretty cool thing.
Happy coding, testing, and exploring!
P.S. If you ever get stuck, just remember the three key questions: Is it running? Is it listening where I think? Can I reach it directly? Those will solve 90% of your local proxy problems!
No Responses