Hey guys, Rocky here! 👋
Welcome to your ultimate guide to Nmap—the Swiss Army knife of networking tools! Whether you’re a cybersecurity newbie, a network admin, or just a curious techie, this tutorial will turn you into an Nmap ninja by the time we’re done. Let’s kick things off by answering the big question:
What is Nmap?
Nmap (short for Network Mapper) is a free, open-source tool used to discover devices, map networks, and audit security by scanning ports and services. Think of it as a supercharged flashlight that lets you peek into the darkest corners of any network. Developed by Gordon “Fyodor” Lyon in 1997, it’s now the go-to tool for hackers, IT pros, and even Hollywood movies (yep, it’s that cool).
Pro Tip: If you’re a visual learner, don’t miss our Nmap Basics Video Tutorial where we break down the essentials in under 10 minutes! 🎥
👉 Watch here:
Why Should You Care?
🕵️ Discover Hidden Devices: Find every gadget connected to your network, from smart fridges to rogue routers.
🛡️ Boost Security: Identify open ports, outdated services, and vulnerabilities before attackers do.
📊 Network Audits: Keep your enterprise or home network organized and secure.
🚀 Penetration Testing: Ethical hackers live by Nmap for red teaming and vulnerability assessments.
But Wait—Is Nmap Legal?
Short answer: Yes, if you use it ethically. Always get explicit permission before scanning networks you don’t own. Nmap’s power comes with responsibility—don’t be that person who accidentally takes down a network or lands in legal trouble.
In this guide, we’ll cover everything from installing Nmap on your OS to running advanced stealth scans and scripting tricks. By the end, you’ll be scanning networks like a pro, spotting risks, and hardening systems like a cybersecurity champ.
Ready to dive in? Let’s roll! 🚀
1. Basic Concepts of Network Scanning
Before we dive into scanning like a pro, let’s nail down the core concepts of network scanning. And guess what? We’ll be using Kali Linux for all the demos here—it’s the ultimate playground for cybersecurity tools, and Nmap comes preinstalled! 🎮🔍 (If you’re new to Kali, don’t sweat it—we’ll keep things simple!)
👉 Watch here: How to Install Kali Linux in 2025 – Step-by-Step Guide 🎥
1.1 Understanding Networks and IP Addresses
At its core, a network is like a digital community where devices—computers, smartphones, servers, routers, and even smart gadgets—connect to share resources, exchange data, or communicate. Imagine a neighborhood where every house (device) has a unique address (IP address) and roads (cables or Wi-Fi signals) link them together. Without these addresses and connections, the internet as we know it wouldn’t exist.
An IP address (Internet Protocol address) is the cornerstone of this system. Think of it as a device’s “home address” on a network. It’s a string of numbers that identifies a device and allows others to locate and communicate with it. For example, 192.168.1.1 is a common IP address for a home router. There are two main versions of IP addresses:
IPv4: The classic format, using four numbers separated by dots (e.g., 192.168.1.1). Each number ranges from 0 to 255, creating about 4.3 billion possible addresses. But here’s the catch—we’ve nearly run out of IPv4 addresses due to the explosion of internet-connected devices.
IPv6: The modern solution to IPv4’s scarcity. It uses a longer format, like 2001:0db8:85a3:0000:0000:8a2e:0370:7334, offering trillions of trillions of addresses. While adoption is still growing, IPv6 ensures every device, sensor, or toaster can have its own unique IP.
Networks are often divided into smaller segments called subnets (sub-networks) to improve efficiency and security. A subnet uses a CIDR notation (Classless Inter-Domain Routing) to define its range, such as 192.168.1.0/24. The /24 here means the first 24 bits of the IP address are fixed, allowing 256 possible addresses in that subnet (from 192.168.1.0 to 192.168.1.255). Subnetting helps organizations manage traffic, isolate devices, and reduce congestion—like dividing a city into boroughs for better governance.
Why does this matter for Nmap? When you scan a network, you’re essentially knocking on doors (IP addresses) and checking which ones are “home” (active). Nmap uses IP addresses to target devices, identify open ports, and map the network’s structure. Without understanding IPs and subnets, you’d be wandering blindly in the digital wilderness.
1.2 TCP vs. UDP Protocols
To master network scanning with Nmap, you need to understand the two heavyweight protocols that govern how data travels across networks: TCP and UDP. These protocols are the backbone of internet communication, but they work in fundamentally different ways—and Nmap leverages both to uncover network secrets.
TCP: The Reliable Perfectionis
TCP (Transmission Control Protocol) is like a meticulous postal service that guarantees delivery. It’s connection-oriented, meaning it establishes a formal handshake between devices before sending data. Here’s how it works:
Three-Way Handshake:
Your device sends a SYN (synchronize) packet to a server.
The server replies with a SYN-ACK (synchronize-acknowledge).
Your device sends a final ACK (acknowledge) to confirm the connection.
Only then does data transfer begin.
Reliability:
TCP ensures data arrives intact. If a packet gets lost, it’s resent.
Used for tasks where accuracy is critical: web browsing (HTTP/HTTPS), emails (SMTP), and file transfers (FTP).
Overhead:
All that reliability comes at a cost. TCP is slower due to its error-checking and acknowledgment processes.
UDP: The Speedy Daredevil
UDP (User Datagram Protocol) is the polar opposite. It’s connectionless—no handshakes, no guarantees. Think of it as tossing a message in a bottle into the ocean and hoping it reaches its destination.
No Frills, No Delays:
Devices send data without establishing a connection.
No retries if packets get lost.
Speed Over Accuracy:
Ideal for real-time applications where speed matters more than perfection: video streaming (e.g., Zoom, YouTube), online gaming, and DNS queries.
Lightweight:
Minimal overhead makes UDP faster but riskier.
Why Does This Matter for Nmap?
Nmap uses these protocols to probe networks in different ways:
TCP Scans:
Perfect for discovering open ports running web servers, databases, or SSH.
Example: nmap -sS 192.168.1.1 (SYN scan—fast and stealthy).
UDP Scans:
Critical for finding services like DNS (port 53) or SNMP (port 161).
Example: nmap -sU 192.168.1.1 (slower but essential for UDP services).
TCP vs. UDP Cheat Sheet
Pro Tip: Firewalls often treat TCP and UDP traffic differently. For example, they might block TCP ports but leave UDP ports wide open. Always scan both to paint a complete picture of your target!
1.3 Ports and Port States (Open, Closed, Filtered)
In the world of networking, ports act as virtual gateways that enable devices to communicate with specific services or applications. Imagine a bustling apartment building: each apartment (port) has a unique number, and behind each door lies a different service—like a web server, email client, or database. Ports range from 0 to 65535, and understanding their states—open, closed, or filtered—is crucial for mapping networks and assessing security risks.
Ports are logical endpoints assigned to services to organize network traffic. They ensure data reaches the correct application, much like a postal code directs mail to the right address. Ports are divided into three categories:
Well-known ports (0-1023): Reserved for critical system services (e.g., HTTP on port 80, HTTPS on 443, SSH on 22).
Registered ports (1024-49151): Used by user-installed applications (e.g., Microsoft SQL Server on 1433).
Dynamic/Ephemeral ports (49152-65535): Temporary ports assigned to client devices during interactions (e.g., your laptop using a random port to fetch a webpage).
Port States Explained
When Nmap scans a port, it categorizes the result into one of three states:
Open
An open port means a service is actively listening for connections. For example, if port 80 is open, the device likely hosts a web server.
Why it matters: Open ports are gateways for legitimate traffic but also prime targets for attackers. Unnecessary open ports can expose vulnerabilities (e.g., an outdated FTP server on port 21).
Closed
A closed port has no service listening, but the host itself is reachable. Think of it as an unlocked door leading to an empty room.
Why it matters: Closed ports indicate the host is active but not offering a specific service. They’re less risky but still useful for network mapping.
Filtered
A filtered port means Nmap can’t determine if it’s open or closed due to interference from firewalls, intrusion detection systems (IDS), or network rules. Packets are dropped or blocked, leaving Nmap in the dark.
Why it matters: Filtered ports suggest security measures are in place, but they can also hide critical vulnerabilities. Skilled attackers use advanced techniques to bypass filtering.
How Nmap Detects Port States
Nmap sends carefully crafted probes (TCP SYN packets, UDP datagrams, etc.) to target ports and analyzes the responses:
Open port: Receives a SYN-ACK (for TCP) or a service-specific reply (for UDP).
Closed port: Receives a RST (reset) packet for TCP or an ICMP error for UDP.
Filtered port: Gets no response or an ambiguous reply (e.g., ICMP unreachable errors).
Why Port States Matter for Security
Identifying open and filtered ports is the backbone of vulnerability assessment. For instance:
An open port 3389 (Remote Desktop Protocol) could allow unauthorized access if poorly secured.
A filtered port 22 (SSH) might indicate a firewall rule hiding a sensitive server.
By cataloging port states, Nmap helps you:
Harden unnecessary services (close open ports).
Audit firewall rules (investigate filtered ports).
Detect unauthorized devices (e.g., a rogue IoT gadget with unexpected open ports).
Pro Tip: On Kali Linux, run nmap -F <target> for a fast scan of the 100 most common ports. Combine this with -v (verbose) to see real-time port state updates!
1.4 Host Discovery Techniques
Before scanning ports or probing services, Nmap needs to answer a critical question: “Which devices are actually alive on the network?” This process, called host discovery, helps you avoid wasting time scanning dead IP addresses and focus on active targets. Let’s break down how Nmap pulls this off—and why it’s a game-changer for efficiency.
Why Host Discovery Matter
Imagine trying to call every phone number in a city to find active lines—it’s tedious and impractical. Host discovery works similarly:
Saves time by skipping inactive IPs.
Reduces network noise (fewer packets = less chance of triggering alarms).
Essential for mapping large networks (e.g., corporate subnets with hundreds of devices).
How Nmap Discovers Hosts
Nmap uses a mix of probes and clever tricks to detect live hosts. Here are the most common techniques:
ICMP Echo Request (Ping Scan)
The classic “ping” method: sends an ICMP Echo Request packet to a target.
If the host replies with an ICMP Echo Reply, it’s marked as alive.
Limitation: Many networks block ICMP for “security through obscurity.”
ARP Scan (Local Networks Only)
On local networks (e.g., your home Wi-Fi), Nmap uses ARP (Address Resolution Protocol) to find devices.
ARP translates IP addresses to MAC addresses (e.g., 192.168.1.1 → AA:BB:CC:DD:EE:FF).
Why it’s gold: ARP scans are blazing fast and bypass most firewalls since ARP is fundamental to LAN operations.
TCP SYN Ping
Sends a TCP SYN packet to a port (default: 80 or 443).
If the host responds with SYN-ACK, it’s alive. No full connection is established, making it stealthy.
Example: nmap -sn -PS80 192.168.1.0/24
UDP Ping
Sends a UDP packet to a port (e.g., DNS port 53).
If the host responds with an ICMP “port unreachable” error, it’s alive.
Use case: Detecting hosts that ignore TCP but respond to UDP.
Reverse-DNS Lookup
Checks if an IP has a DNS (Domain Name) record.
A valid DNS name often indicates an active device.
Host Discovery in Action
Command:
nmap -sn 192.168.1.0/24
The -sn flag tells Nmap to skip port scanning and focus on host discovery.
Output: A list of live IPs, MAC addresses (for local networks), and hostnames.
Example Output:
Nmap scan report for 192.168.1.1
Host is up (0.002s latency).
MAC Address: AA:BB:CC:DD:EE:FF (RouterManufacturer)
Host Discovery Cheat Sheet
Pro Tips for Kali Linux Users
Local Networks: ARP scans are automatic in Kali. Just run nmap -sn 192.168.1.0/24 to map your LAN.
External Networks: Combine TCP SYN pings (-PS) and UDP pings (-PU) to bypass firewalls.
Stealth Mode: Use -T2 (polite timing) to avoid overwhelming targets.
Why Skip Host Discovery?
Sometimes you know a host is up (e.g., a web server). Use -Pn to force Nmap to scan all targets, even if they appear dead. This is handy for:
Penetration testing (avoiding detection by skipping noisy pings).
Scanning targets behind strict firewalls that block discovery probes.
2. Basic Nmap Commands and Scans
Let’s roll up our sleeves and run some real Nmap scans on the Metasploitable 2 machine (IP: 192.168.147.131). This vulnerable VM is perfect for testing—it’s packed with open ports and outdated services. I’ll include command examples and sample outputs below, but don’t forget to check the attached images for visual guides!
2. 1. Simple Ping Scan (nmap -sn)
👋 Let’s kick off your hands-on Nmap journey with the Simple Ping Scan, the go-to command for answering one critical question: “Is this device alive on the network?”
What Does nmap -sn Do?
The -sn flag tells Nmap to skip port scanning and focus solely on host discovery. It sends a mix of probes to determine if a target is online, including:
ICMP Echo Requests (classic “ping” packets).
ARP Requests (for devices on your local network).
TCP SYN Probes (to common ports like 80 or 443).
UDP Probes (to check for UDP-responsive hosts).
This scan is fast, stealthy, and perfect for mapping networks without triggering too many alarms.
When to Use a Ping Scan
Inventory your home or office network.
Verify if a server or device is online before deeper scanning.
Avoid unnecessary port scans on inactive hosts.
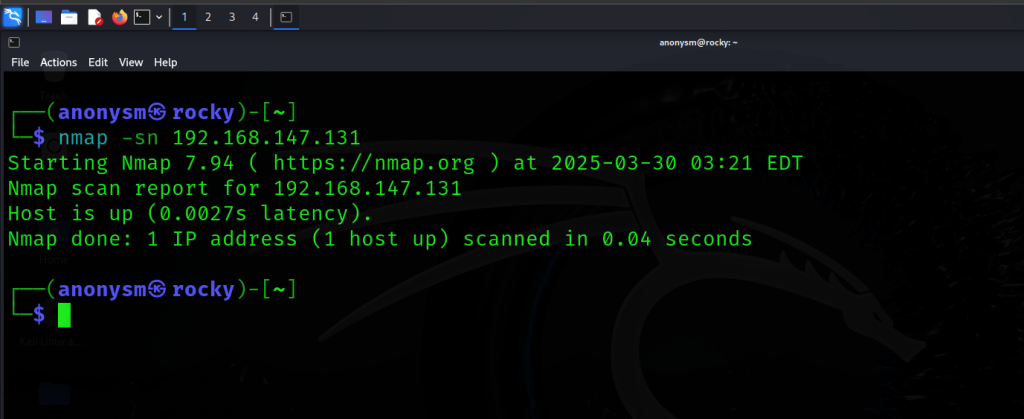
Step-by-Step Demo on Metasploitable 2
Target IP: 192.168.147.131
Command:
nmap -sn 192.168.147.131
What Happens Behind the Scenes:
On Local Networks:
Kali Linux sends an ARP request to the target’s MAC address.
If Metasploitable 2 responds, it’s marked as “alive.”
On Remote Networks:
Nmap sends ICMP pings and TCP SYN packets to gauge responsiveness.
Sample Output:
Scanning an Entire Subnet
Want to map all devices on your local network? Use a CIDR range (e.g., /24 for 256 IPs):
Command:
nmap -sn 192.168.147.0/24
Output:
Why It’s Not Always Perfect
Firewalls/IDS: May block ICMP or SYN packets, causing false “down” results.
ARP Limitations: Only works on local networks.
No Port Data: This scan doesn’t tell you what’s running—just what’s alive.
Pro Tips
Bypass ICMP Blocks: Force TCP or UDP probes with flags like PS80 (TCP port 80) or PU53 (UDP port 53). nmap -sn -PS80 192.168.147.131
Speed: Use T4 for faster scans on reliable networks.
Ethics: Always get permission—even a ping scan can look suspicious!
Common Questions
Q: Why does Nmap say “Host seems down” even if the device is online?
A: The target might block all discovery probes. Use -Pn to assume it’s up and scan ports anyway.
Q: Can I ping scan IPv6 addresses?
A: Yes! Use -6:
nmap -6 -sn fe80::20c:29ff:feXX:XXXX
Lab Time: Try running nmap -sn on your local network and share how many devices you find in the comments! 🕵️♂️
2.2 Basic Port Scan (nmap [target])
Now that you’ve confirmed your target is alive, it’s time to dig deeper with a Basic Port Scan. This is where Nmap shines—it checks the 1,000 most common ports to reveal what services are running, what’s vulnerable, and where to focus your security efforts. Let’s break it down using our Metasploitable 2 lab machine (IP: 192.168.147.131).
What Does nmap [target] Do?
This default scan answers three key questions:
Which ports are open? (e.g., port 80 for HTTP, port 22 for SSH).
What services are running? (e.g., Apache 2.2.8, OpenSSH 4.7).
What’s the device’s operating system? (Nmap makes educated guesses based on network behavior).
Step-by-Step Demo
Command:
nmap 192.168.147.131
What Happens:
Nmap scans the top 1,000 ports (from a list of common services like HTTP, FTP, SSH, etc.).
It sends probes (TCP SYN packets) to each port and analyzes responses to determine if they’re open, closed, or filtered.
It attempts service version detection to identify software running on open ports.
Sample Output
Key Takeaways from the Output
Open Ports:
Port 21: FTP server (vsftpd 2.3.4)—a notoriously vulnerable version.
Port 22: SSH server (OpenSSH 4.7)—outdated and potentially risky.
Port 80: Apache web server—check for misconfigurations or old software.
Closed Ports: 977 ports had no listening services (e.g., port 111 in this example).
Service Versions: Critical for spotting vulnerabilities (e.g., vsftpd 2.3.4 is linked to a backdoor exploit).
Why Use a Basic Port Scan?
Quick Recon: Fast way to identify low-hanging fruit for security audits.
Prioritize Risks: Focus on open ports running outdated or exploitable services.
Foundation for Advanced Scans: Use results to plan targeted scans (e.g., sV for deeper version detection).
Pro Tips
Speed vs. Accuracy:
Use T4 for faster scans: nmap -T4 192.168.147.131.
Use sV for detailed service versions: nmap -sV 192.168.147.131.
Filter Noise:
Hide closed ports with -open: nmap –open 192.168.147.131
Save Results: Export to a file for later analysis: nmap -oN scan_results.txt 192.168.147.131
Common Questions
Q: Why are only 1,000 ports scanned by default?
A: It’s a balance between speed and coverage. Most services run on common ports (e.g., 80, 443, 22). Use -p- to scan all 65,535 ports (but this takes much longer).
Q: Why does Nmap show “filtered” ports?
A: Firewalls or routers are blocking Nmap’s probes. Use advanced techniques like -sS (SYN scan) or -A (aggressive scan) to bypass them.
Q: Can I scan multiple targets at once?
A: Yes! Separate IPs with spaces:
nmap 192.168.147.131 192.168.147.132
Metasploitable 2 is designed to be insecure, so your scan will reveal dozens of open ports. This makes it a perfect lab to practice:
Exploiting FTP on port 21.
Testing SSH vulnerabilities on port 22.
Auditing the Apache web server on port 80.
Lab Time: Run a basic port scan on your local router or another lab device. How many open ports did you find? Share below! 🔍
2.3 Scanning Multiple Targets
Ready to level up from single-target scans? Let’s tackle scanning multiple targets—a must-have skill for mapping entire networks, auditing enterprise environments, or testing a fleet of servers. Whether you’re working with IP ranges, lists, or entire subnets, Nmap makes it easy.
Why Scan Multiple Targets?
Network Inventory: Discover all devices on your LAN (e.g., smart TVs, printers, servers).
Security Audits: Identify vulnerabilities across multiple systems at once.
Efficiency: Save time by scanning dozens (or hundreds) of IPs in one command.
Methods to Scan Multiple Targets
1. Scan a Range of IPs
Use a hyphen (-) to define a sequential range of IP addresses.
Command:
nmap 192.168.147.1-10
What It Does:
Scans IPs from 192.168.147.1 to 192.168.147.10.
Perfect for small, targeted batches.
Sample Output:
Nmap scan report for 192.168.147.1
Host is up (0.001s latency).
Not shown: 998 closed ports
PORT STATE SERVICE
80/tcp open http
Nmap scan report for 192.168.147.131
Host is up (0.002s latency).
PORT STATE SERVICE
21/tcp open ftp
22/tcp open ssh
…
2. Scan a Subnet (CIDR Notation)
Use /24 (or another CIDR) to scan all IPs in a subnet.
Command:
nmap 192.168.147.0/24
What It Does:
Scans all 256 IPs in the 192.168.147.* range.
Pro Tip: Add sn for a fast ping sweep: nmap -sn 192.168.147.0/24
Sample Output:
Nmap scan report for 192.168.147.1
Host is up (0.001s latency).
MAC Address: AA:BB:CC:DD:EE:FF (RouterBrand)
Nmap scan report for 192.168.147.131
Host is up (0.002s latency).
MAC Address: 00:0C:29:XX:XX:XX (VMware)
…
3. Scan from a List of IPs
Use the -iL flag to load targets from a text file.
Step 1: Create a file targets.txt:
192.168.147.1
192.168.147.131
192.168.147.200
Step 2: Run the scan:
nmap -iL targets.txt
What It Does:
Scans all IPs listed in targets.txt.
Ideal for pre-defined targets (e.g., critical servers).
Advanced Multi-Target Scans
Combine flags for precision:
Scan Specific Ports Across Multiple IPs
nmap -p 80,443 192.168.147.1-10
Checks ports 80 (HTTP) and 443 (HTTPS) on IPs 1-10.
Aggressive Scan on a Subnet
nmap -A -T4 192.168.147.0/24
A: Enables OS detection, version detection, and script scanning.
T4: Faster scan (trade speed for stealth).
Real-World Example: Metasploitable Lab
Command:
nmap -p 21,22,80 192.168.147.1-20
Goal:
Find FTP (21), SSH (22), and HTTP (80) services in the first 20 IPs.
Metasploitable 2 (192.168.147.131) will show open ports, while others may be closed or filtered.
Common Issues & Fixes
Scan Too Slow?
Limit ports: p 21,22,80.
Use timing templates: T4 (fast) or T5 (insane, use with caution).
Too Noisy?
Add -max-rate 100 to limit packets per second.
Permission Denied?
Run Nmap as root/sudo: sudo nmap ….
Pro Tips
Ethics First: Always get permission before scanning large networks.
Output Management: Save results to separate files for analysis: nmap -oN scan_results.txt -iL targets.txt
Exclude Hosts: Skip specific IPs with -exclude: nmap 192.168.147.0/24 –exclude 192.168.147.1
Lab Challenge: Run a scan on your local subnet (192.168.1.0/24 or similar). How many devices did you find? Share your results below! 🔍
2.4. Specifying Port Ranges (p)
Want to avoid scanning all 65,535 ports and focus only on what matters? The -p flag is your scalpel for surgical precision. Whether you’re targeting a single port, a custom range, or the most critical services, this command lets you cut through the noise.
Why Specify Port Ranges?
Speed: Scanning fewer ports = faster results.
Stealth: Fewer packets = less chance of triggering alerts.
Focus: Target high-value ports (e.g., web servers, databases) for security audits.
How to Use the p Flag
1. Scan a Single Port
Command:
nmap -p 80 192.168.147.131
What It Does:
Checks only port 80 (HTTP) for activity.
Use case: Verify if a web server is running.
Sample Output:
PORT STATE SERVICE
80/tcp open http
2. Scan a Range of Ports
Use a hyphen (-) to define a sequential range.
Command:
nmap -p 1-100 192.168.147.131
What It Does:
Scans ports 1 to 100 (common for system services like FTP, SSH, and Telnet).
Pro Tip: Combine with sV to detect service versions: nmap -p 1-100 -sV 192.168.147.131
Sample Output:
PORT STATE SERVICE VERSION
21/tcp open ftp vsftpd 2.3.4
22/tcp open ssh OpenSSH 4.7p1
23/tcp open telnet Linux telnetd
…
3. Scan Multiple Ports/Ranges
Separate ports/ranges with commas (,).
Command:
nmap -p 21,22,80-100,443 192.168.147.131
What It Does:
Targets FTP (21), SSH (22), HTTP (80-100), and HTTPS (443).
Use case: Focus on common attack vectors.
4. Scan Top N Ports
Use –top-ports to scan the most frequently used ports.
Command:
nmap –top-ports 10 192.168.147.131
What It Does:
Scans the 10 most common ports (e.g., 80, 443, 22, 21).
Pro Tip: Combine with sV for version detection.
5. Scan All Ports
Warning: This is slow and noisy! Use sparingly.
Command:
nmap -p- 192.168.147.131
What It Does:
Scans all 65,535 ports (takes 30+ minutes for a single host).
Use case: Comprehensive penetration testing.
Metasploitable 2 Lab Demo
Let’s hunt for high-risk services on our vulnerable VM:
Command:
nmap -p 21,22,80,3306,5900 192.168.147.131
Expected Results:
Port 21: Vulnerable FTP server (vsftpd 2.3.4).
Port 22: Outdated OpenSSH.
Port 80: Apache web server (check for misconfigurations).
Port 3306: MySQL database (default credentials: root:toor).
Port 5900: VNC server (often unsecured).
Pro Tips
Exclude Ports: Use -exclude-ports to skip unwanted ports. nmap -p 1-1000 –exclude-ports 80,443 192.168.147.131
UDP Ports: Scan UDP services with sU (e.g., DNS on port 53): nmap -sU -p 53,161 192.168.147.131
Port Lists: Save custom port lists in a file and load them with p $(cat ports.txt).
Common Mistakes
Syntax Errors: Use commas for multiple ports, hyphens for ranges.
✅ p 21,22,80-100
❌ p 21-22-80
Over-Scanning: Avoid p- unless absolutely necessary—it’s loud and slow.
Why This Matters for Security
Targeted Attacks: Hackers often focus on specific ports (e.g., 445 for SMB exploits).
Compliance: Auditors check for unnecessary open ports (e.g., Telnet on port 23).
Resource Management: Reduce server load by closing unused ports.
Lab Challenge: Run a scan on ports 21-30 of your local router. What’s open? Share your findings below! 🔍
2.5. Verbose Output (v) and Debugging (d)
👋 Ever run an Nmap scan and thought, “What’s actually happening behind the scenes?” The -v (verbose) and -d (debug) flags pull back the curtain, giving you real-time insights and troubleshooting superpowers.
Verbose Mode (v)
Purpose: Get real-time updates and detailed logs during your scan.
When to Use:
Track scan progress (e.g., how many ports are left).
See resolved hostnames, open ports, and service detection in real time.
Identify delays or unexpected behavior.
Command:
nmap -v 192.168.147.131
Sample Output:
Starting Nmap 7.94 ( <https://nmap.org> )
Initiating ARP Ping Scan at 15:30
Scanning 192.168.147.131 [1 port]
Completed ARP Ping Scan at 15:30 (0.01s)
Initiating Parallel DNS resolution of 1 host.
Completed Parallel DNS resolution of 1 host. (0.01s)
Initiating SYN Stealth Scan at 15:30
Scanning 192.168.147.131 [1000 ports]
Discovered open port 21/tcp on 192.168.147.131
Discovered open port 22/tcp on 192.168.147.131
…
Key Features:
Shows timing and phases (e.g., ARP scan, DNS resolution, port scanning).
Lists open ports as they’re discovered.
Use vv for extra verbosity (even more details).
Debug Mode (d)
Purpose: Get technical logs for troubleshooting failed scans or errors.
When to Use:
Diagnose why a scan hangs or crashes.
Understand packet-level interactions (e.g., blocked probes, strange responses).
Report bugs to the Nmap team.
Command:
nmap -d 192.168.147.131
Sample Output:
[DEBUG] Packet capture details: enp0s3 (up), MTU 1500, IPv4
[DEBUG] Sending ARP ping to 192.168.147.131
[DEBUG] Received ARP response: 00:0C:29:XX:XX:XX
[DEBUG] Sending SYN probe to port 21 (tcp)
[DEBUG] Received SYN/ACK from 192.168.147.131:21
…
Key Features:
Displays raw packet data and timing details.
Logs interactions with firewalls or IDS.
Use d3 or higher (up to d9) for extreme debugging (developer-level logs).
Combining Verbose and Debug (v -d)
For maximum visibility, stack these flags:
Command:
nmap -v -d 192.168.147.131
What You’ll See:
Real-time progress updates and technical logs.
Perfect for diagnosing complex network issues.
Real-World Example: Hanging Scan
Scenario: Your scan freezes at 90%.
Command:
nmap -v -d 192.168.147.131
Diagnosis:
Debug logs might reveal a firewall dropping packets or a misconfigured router.
Verbose logs show which phase is stuck (e.g., port 443 timing out).
Fix:
Adjust timing (T4).
Skip problematic ports (-exclude-ports 443).
Pro Tips
Save Logs: Export verbose/debug output to a file: nmap -v -d -oN scan_log.txt 192.168.147.131
Filter Noise: Use grep to search logs for keywords like “open” or “error”: cat scan_log.txt | grep “open port”
Stealth Trade-Off: Verbose/debug modes increase scan noise—avoid them in sensitive environments.
Common Debugging Scenarios
“Host Appears Down”:
Check logs for blocked ICMP/ARP probes.
Use Pn to skip host discovery and force port scanning.
Slow Scans:
Debug logs show delays in probe responses.
Fix: Adjust timing template (T4) or reduce parallel probes (-min-parallelism 10).
Firewall Interference:
Logs reveal dropped packets or RST (reset) responses.
Fix: Use stealth scans (sS) or fragment packets (f).
Metasploitable 2 Demo
Command:
nmap -v -d -p 21,22,80 192.168.147.131
What You’ll Learn:
How Nmap interacts with FTP, SSH, and HTTP ports.
How services respond to SYN probes.
How to interpret timing and packet details.
Lab Challenge: Run a verbose scan on your router (nmap -v [router-IP]). How many ports are open? Share your logs!
3. Nmap Scripting Engine (NSE)
Hold onto your terminals—this is where Nmap transforms from a simple scanner into a hacker’s multitool. The Nmap Scripting Engine (NSE) lets you automate tasks, exploit vulnerabilities, and dig deeper into networks using pre-built or custom scripts. Let’s crack open this treasure chest and see how it supercharges your scans!
What is the NSE?
The NSE is a Lua-based framework that extends Nmap’s capabilities. It comes bundled with 600+ scripts (and growing!) to:
Automate Recon: Enumerate services, extract banners, or brute-force logins.
Detect Vulnerabilities: Check for flaws like Heartbleed, Shellshock, or outdated software.
Interact with Protocols: Probe databases, APIs, IoT devices, or industrial systems.
NSE Script Categories
Scripts are organized by purpose. Key categories include:
How to Use NSE Scripts
Basic Syntax
nmap –script <script-name> <target>
Examples
Run a Single Script: nmap –script http-enum 192.168.147.131
Scans for common web directories (e.g., /admin, /login).
Run a Category: nmap –script vuln 192.168.147.131
Checks for all vulnerabilities in the vuln category.
Run Multiple Scripts: nmap –script http-enum,ftp-anon 192.168.147.131
Combines HTTP directory enumeration and FTP anonymous login checks.
Popular Scripts in Action
1. HTTP Enumeration (http-enum)
Command:
nmap –script http-enum -p 80 192.168.147.131
Output:
PORT STATE SERVICE
80/tcp open http
| http-enum:
| /admin/: Possible admin dashboard
| /backup/: Backup files
| /logs/: Log directory
2. FTP Brute-Force (ftp-brute)
Command:
nmap –script ftp-brute –script-args userdb=users.txt,passdb=passwords.txt 192.168.147.131
Output:
PORT STATE SERVICE
21/tcp open ftp
| ftp-brute:
| Valid credentials:
| Username: admin Password: password123
3. Vulnerability Detection (http-sql-injection)
Command:
nmap –script http-sql-injection -p 80 192.168.147.131
Output:
PORT STATE SERVICE
80/tcp open http
| http-sql-injection:
| Possible SQLI at <http://192.168.147.131/search?query=1>’
Custom Scripts & Arguments
Load Custom Scripts: nmap –script /path/to/custom-script.nse 192.168.147.131
Pass Script Arguments: nmap –script http-enum –script-args http-enum.displayall=true 192.168.147.131
NSE Best Practices
Start Safe: Use -script=safe to avoid accidental damage.
Test Locally: Run intrusive scripts on your lab (e.g., Metasploitable 2) first.
Stay Legal: Brute-force scripts can lock accounts—always get permission!
Update Regularly: Pull the latest scripts with sudo nmap –script-updatedb.
Real-World Metasploitable 2 Demo
Command:
nmap –script vuln -p 21,80 192.168.147.131
Expected Findings:
Port 21: vsftpd 2.3.4 backdoor vulnerability.
Port 80: Outdated Apache with potential exploits.
Troubleshooting NSE
Script Not Working? Check dependencies (e.g., Python libraries for certain scripts).
Timeout Issues: Increase timeout with -script-timeout 2m.
Debug Scripts: Add d to see Lua errors.
Lab Time: Run nmap –script ssh-hostkey 192.168.147.131. What’s the SSH key fingerprint? Share your findings!
4. Output Formats and Reporting
Scanning a network is just half the battle—organizing and interpreting results is where the real magic happens. Whether you’re writing a security report, sharing findings with your team, or automating analysis, Nmap’s output formats have you covered. Let’s break down how to save, parse, and present your scans like a pro!
Nmap Output Formats
Nmap supports multiple formats to suit different needs:
1. Normal Output (oN)
Command:
nmap -p 80,443 -oN scan_results.txt 192.168.147.131
Sample Output:
# Nmap 7.94 scan initiated Wed Jan 1 12:00:00 2024
Nmap scan report for 192.168.147.131
Host is up (0.001s latency).
PORT STATE SERVICE
80/tcp open http
443/tcp open https
Best For: Quick reviews or sharing raw results with non-technical teams.
2. XML Output (oX)
Command:
nmap -p 21,22 -oX scan_results.xml 192.168.147.131
Sample Output:
<?xml version=”1.0″ encoding=”UTF-8″?>
<nmaprun scanner=”nmap” args=”nmap -p 21,22 -oX scan_results.xml 192.168.147.131″>
<host>
<address addr=”192.168.147.131″ addrtype=”ipv4″/>
<ports>
<port protocol=”tcp” portid=”21″>
<state state=”open” reason=”syn-ack”/>
<service name=”ftp” product=”vsftpd 2.3.4″/>
</port>
</ports>
</host>
</nmaprun>
Best For:
Importing into tools like Metasploit, Nessus, or custom scripts.
Generating HTML/PDF reports (e.g., with xsltproc).
3. Grepable Output (oG)
Command:
nmap -p 80 -oG scan_results.grep 192.168.147.131
Sample Output:
Host: 192.168.147.131 ()
Ports: 80/open/tcp//http///
Best For:
Parsing with grep, awk, or Python/PowerShell scripts.
Example: Extract open ports: grep “open” scan_results.grep | awk ‘{print $5}’
4. Saving All Formats (oA)
Command:
nmap -p 1-100 -oA full_scan 192.168.147.131
Creates three files: full_scan.nmap, full_scan.xml, full_scan.gnmap.
Generating Professional Reports
XML to HTML with xsltproc
Convert XML to a readable HTML report: xsltproc scan_results.xml -o report.html
Open report.html in a browser for a clean, visual layout.
Using Tools like Zenmap
Nmap’s GUI (Zenmap) generates interactive topology maps and saves scans in all formats:
Z
Analyzing Scan Results
Prioritize Risks: Focus on open ports with outdated services (e.g., vsftpd 2.3.4).
Compare Scans: Use ndiff to track changes over time: ndiff scan1.xml scan2.xml
Automate Alerts: Write scripts to flag unexpected open ports (e.g., port 22 on a non-server device).
Real-World Example: Metasploitable 2 Report
Command:
nmap -A -p- -oX metasploitable_scan.xml 192.168.147.131
Steps:
Run the scan with OS detection (O), version detection (sV), and aggressive scripts (A).
Generate an HTML report: xsltproc metasploitable_scan.xml -o report.html
Share report.html with your team to highlight vulnerabilities like FTP backdoors or outdated Apache.
Pro Tips
Ethical Reporting: Always anonymize sensitive IPs/hostnames before sharing externally.
Automation: Schedule scans and auto-generate reports with cron jobs or CI/CD pipelines.
Tool Integration: Pipe Nmap XML into tools like Elasticsearch or Splunk for dashboards.
Common Issues & Fixes
Permission Denied: Use sudo when saving files to restricted directories.
Empty Output: Ensure the target IP is correct and reachable.
Unreadable XML: Validate with nmap -d -v -oX scan.xml to catch errors.
Lab Challenge: Run a scan on your local machine, save it as XML, and convert it to HTML. What vulnerabilities did you find? Share your report!
Nmap commands
This table is by no means exhaustive, but it should cover most of the main commands and techniques you’ll use with Nmap. For a complete list of options and how to use them, refer to the official Nmap documentation.
Conclusion
Nmap is more than just a port scanner—it’s a powerhouse for uncovering the hidden layers of any network. From mapping devices and detecting vulnerabilities to automating tasks with the Nmap Scripting Engine (NSE), this tool equips you with the skills to secure systems, troubleshoot issues, and think like a cybersecurity professional. Whether you’re a network admin hardening infrastructure, a penetration tester probing for weaknesses, or a curious learner exploring the digital world, Nmap’s versatility makes it an indispensable ally.
Throughout this guide, we’ve journeyed from the fundamentals of IP addresses and protocols and script-driven exploitation. Using Metasploitable 2 as our lab, we’ve seen firsthand how open ports and outdated services create gateways for attackers—and how Nmap’s insights can turn those risks into actionable fixes. But with great power comes great responsibility: always prioritize ethics, obtain proper permissions, and use your skills to build safer systems, not exploit them.
As networks grow more complex, the need for robust security practices has never been greater. Nmap’s continuous development and passionate community ensure it stays ahead of emerging threats, making it a future-proof tool in your arsenal. So keep experimenting in controlled labs, dive into scripting, and stay curious. The world of cybersecurity is vast, but with Nmap in your toolkit, you’re already miles ahead.
Ready to take the next step? Revisit your scans, tweak your commands, and challenge yourself to uncover something new. The network is your canvas—paint it secure.
Frequently Asked Questions (FAQs)
1. Is Nmap Illegal to Use?
Answer:
Nmap itself is 100% legal software, but how you use it matters. Scanning networks without explicit permission is illegal in many jurisdictions. Always:
Get written consent before scanning networks you don’t own.
Use it ethically (e.g., testing your own systems, authorized penetration tests).
Avoid scanning public infrastructure (e.g., government websites).
2. Can Nmap Crash a Network or Device?
Answer:
Nmap is designed to be safe, but poorly configured scans can cause issues:
Aggressive timing (T5) might overwhelm fragile devices (e.g., IoT gadgets).
UDP scans (sU) on sensitive services (e.g., DNS) could trigger crashes.
Best Practice: Start with T3 timing and test in lab environments first.
3. What’s the Difference Between TCP and UDP Scans?
Answer:
TCP Scans (e.g., sS, sT): Target connection-oriented services (HTTP, SSH). Faster and more common.
UDP Scans (sU): Target connectionless services (DNS, SNMP). Slower because UDP lacks built-in responses.
Pro Tip: Always run UDP scans for critical services like DNS (port 53).
4. How Do I Avoid Detection by Firewalls or IDS?
Answer: Use stealth techniques, but only with permission:
Stealth Scans: sS (SYN scan) avoids full TCP connections.
Decoys: D RND:5 hides your IP among decoys.
Fragmentation: f splits packets to evade detection.
Timing: Slow scans (T2) reduce suspicion.
5. Why Are Some Ports Marked as Filtered?
Answer:
A filtered port means a firewall, router, or IDS is blocking Nmap’s probes. You can’t tell if the port is open or closed. To troubleshoot:
Use sS (SYN scan) or sT (TCP connect scan).
Try -reason to see why a port was labeled filtered.
6. How Do I Scan IPv6 Addresses?
Answer: Use the -6 flag:
nmap -6 2001:db8::1
Ensure your network and target support IPv6.
Combine with other flags (e.g., sS -6 for a stealth IPv6 scan).
7. What Does “Host Seems Down” Mean, and How Do I Fix It?
Answer:
Nmap’s host discovery failed. Solutions:
Bypass Discovery: Use Pn to scan all ports (assumes the host is up).
Adjust Probes: Try PS80,443 (TCP SYN pings to ports 80/443).
Check Connectivity: Ensure the target is reachable (e.g., ping).
8. Are NSE Scripts Safe to Use?
Answer:
Most scripts are safe, but some (e.g., brute, exploit) can disrupt services. Tips:
Start with -script=safe for non-intrusive scans.
Test risky scripts (e.g., http-slowloris) in labs first.
Review script documentation with nmap –script-help <script-name>.
9. How Can I Speed Up My Nmap Scans?
Answer:
Limit Ports: p 1-1000 scans fewer ports.
Timing Template: Use T4 (aggressive) or T5 (insane).
Parallelism: Increase -min-parallelism 100.
Skip DNS: Add n to disable reverse-DNS resolution.
10. How Do I Update Nmap and Its Scripts?
Answer:
Nmap:
Linux: sudo apt update && sudo apt upgrade nmap
Windows: Download the latest version from nmap.org.
NSE Scripts: sudo nmap –script-updatedb
Bonus: Can Nmap Exploit Vulnerabilities?
Answer:
No—Nmap is a reconnaissance tool, not an exploit framework. However:
It detects vulnerabilities via NSE scripts (e.g., vuln category).
Pair it with tools like Metasploit to exploit findings.
Got More Questions?
Visit the Official Nmap Documentation.
Join the Nmap community on Reddit, Discord, or mailing lists.
Experiment in safe environments like Hack The Box or TryHackMe.
No Responses